Describe an experiment and get a labeled lab setup diagram: titration, distillation, reflux, filtration, gas collection, chromatography, gel electrophoresis or a Bunsen burner heating setup. Glassware is clamped, condenser water runs the right way and nothing is heated sealed. Make a blank version for a worksheet, then its answer key from the same drawing.
Titration to gel electrophoresisClamped, vented, correct flowWorksheet + answer key
Checked against lab technique manuals
Worksheet + answer key pairs
Print-ready PNG
AI Lab Diagram Maker
Pick a setup or describe your own, then choose the labels and the drawing style.
655 / 2000 characters
Generate a publication-ready PNG from your description.
Preview
Lab Diagram Example Previews
Target aspect ratio: 4:3
Sample previews. Describe your experiment to generate your own lab setup diagram.
Lab Diagram Examples
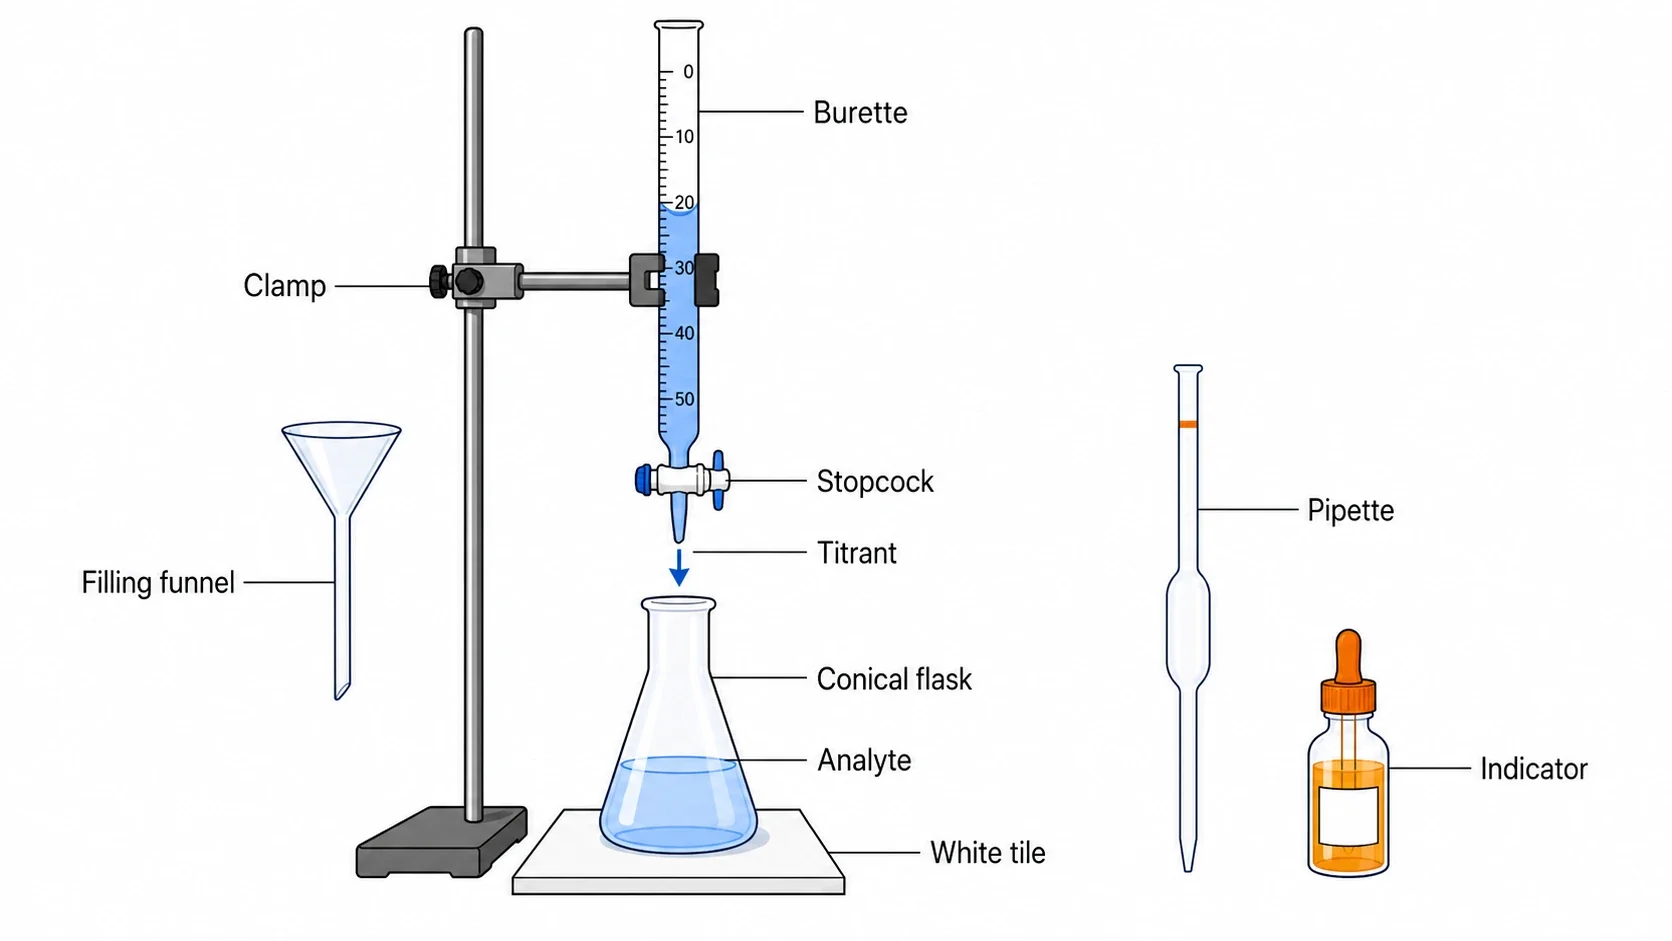
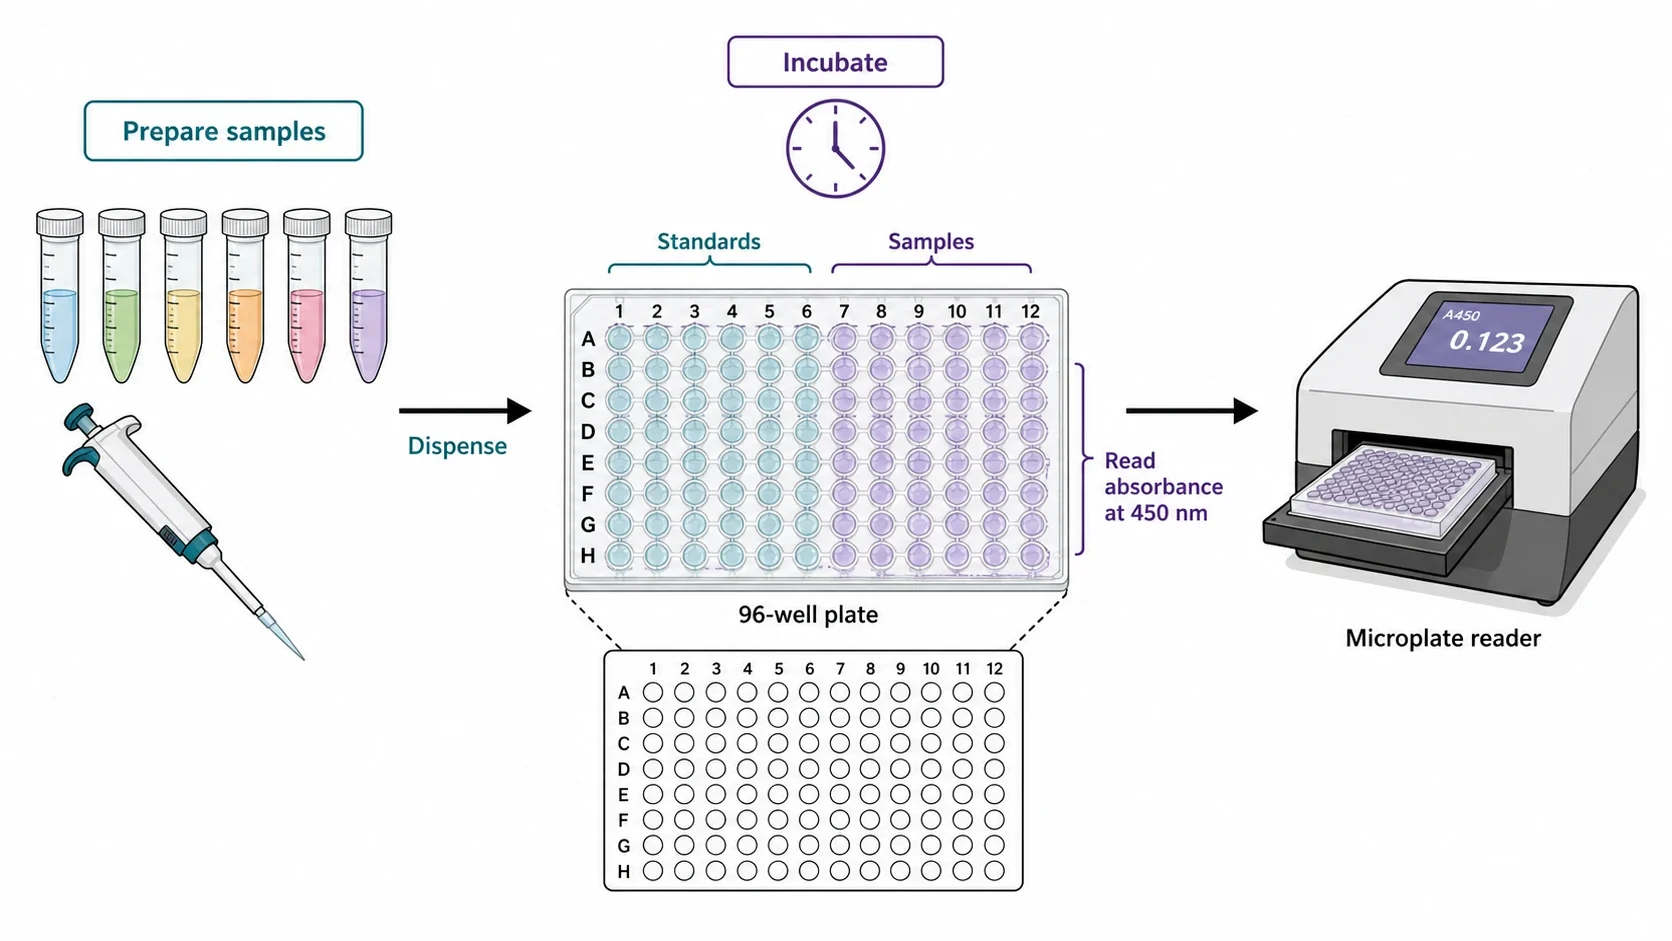
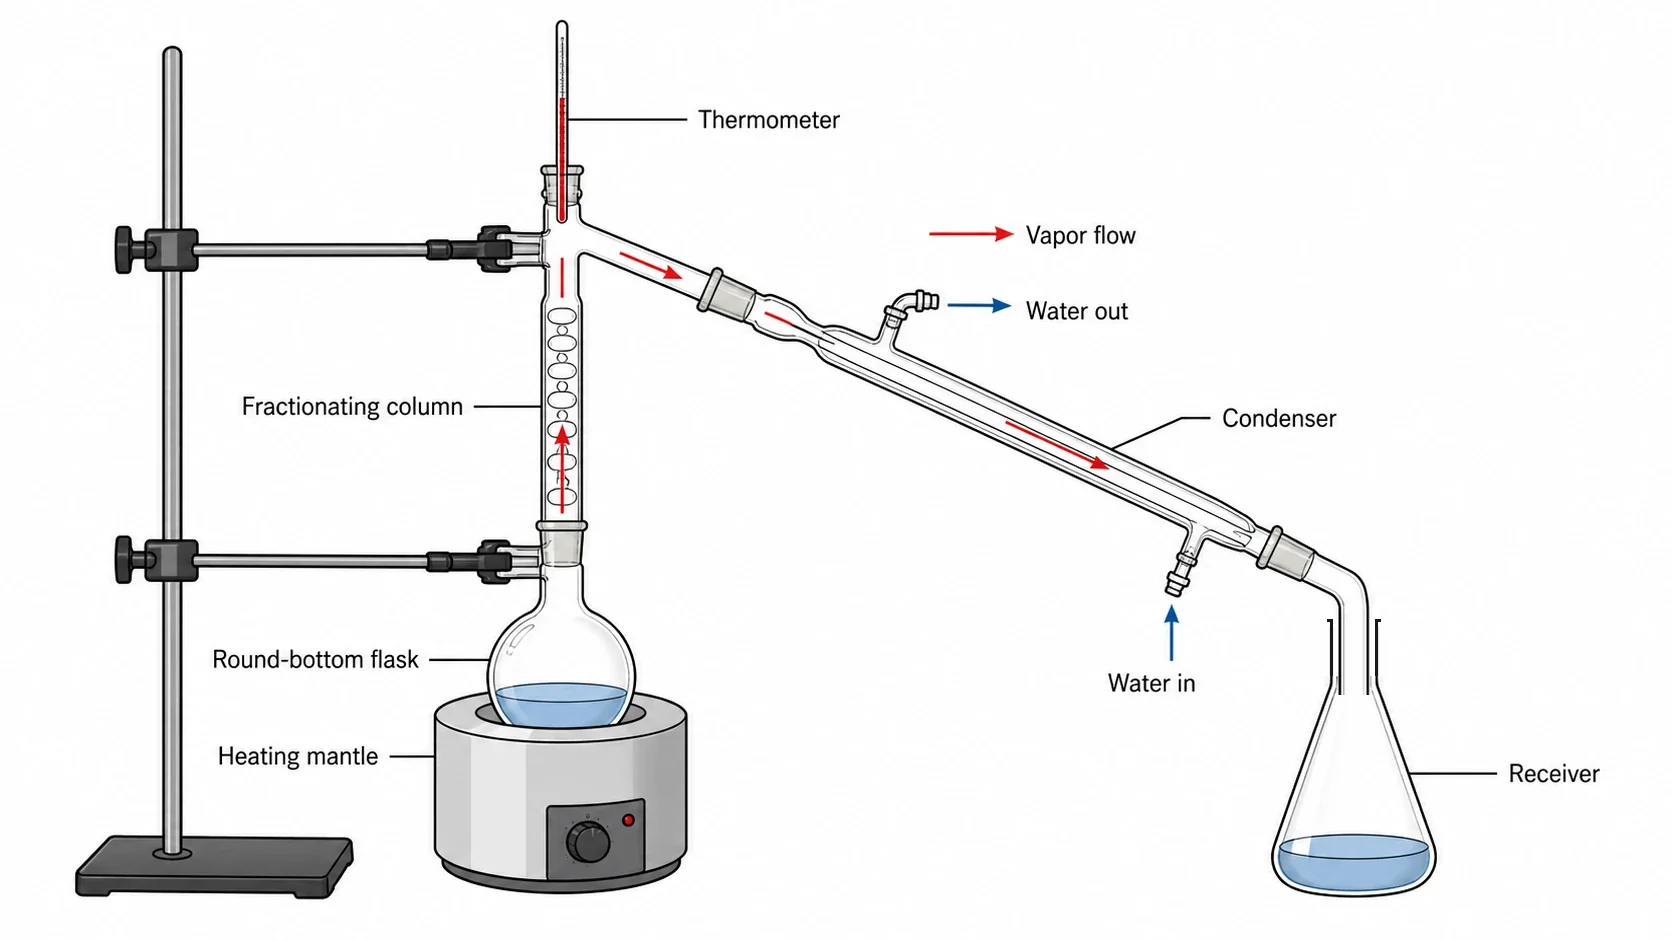
A fractional distillation with the condenser water and thermometer placed correctly, a titration setup with its equipment, and a microplate assay for a biology lab.
Prompt
Create a labeled fractional distillation lab diagram on a white background in clean textbook line art. On the left, a retort stand with two clamps holds a vertical fractionating column packed with glass beads, fitted into a round-bottom flask that sits in a heating mantle. A still head on top of the column carries a thermometer with its bulb level with the side arm. The side arm leads into a condenser sloping down to the right: cooling water enters at the lower inlet near the receiver and leaves from the upper outlet near the still head. A bent adapter at the end of the condenser leads into an open conical flask used as the receiver. Draw red arrows for vapor rising up the column and along the condenser, and blue arrows for the water. Label "Thermometer", "Fractionating column", "Round-bottom flask", "Heating mantle", "Condenser", "Water in", "Water out", "Vapor flow" and "Receiver".
Fractional distillation
Use this example
Prompt
Create a labeled titration setup diagram on a white background. A 50 mL burette, graduated with 0 at the top and 50 near the bottom and partly filled with blue titrant, is held vertically by a clamp on a retort stand. Its stopcock sits just above a conical flask of analyte standing on a white tile, with a small arrow showing titrant dripping in. Beside the stand, draw the filling funnel, kept off the burette during the titration, and on the right a volumetric pipette with one calibration mark and a dropper bottle of indicator. Label "Burette", "Clamp", "Stopcock", "Titrant", "Conical flask", "Analyte", "White tile", "Filling funnel", "Pipette" and "Indicator".
Titration
Use this example
Prompt
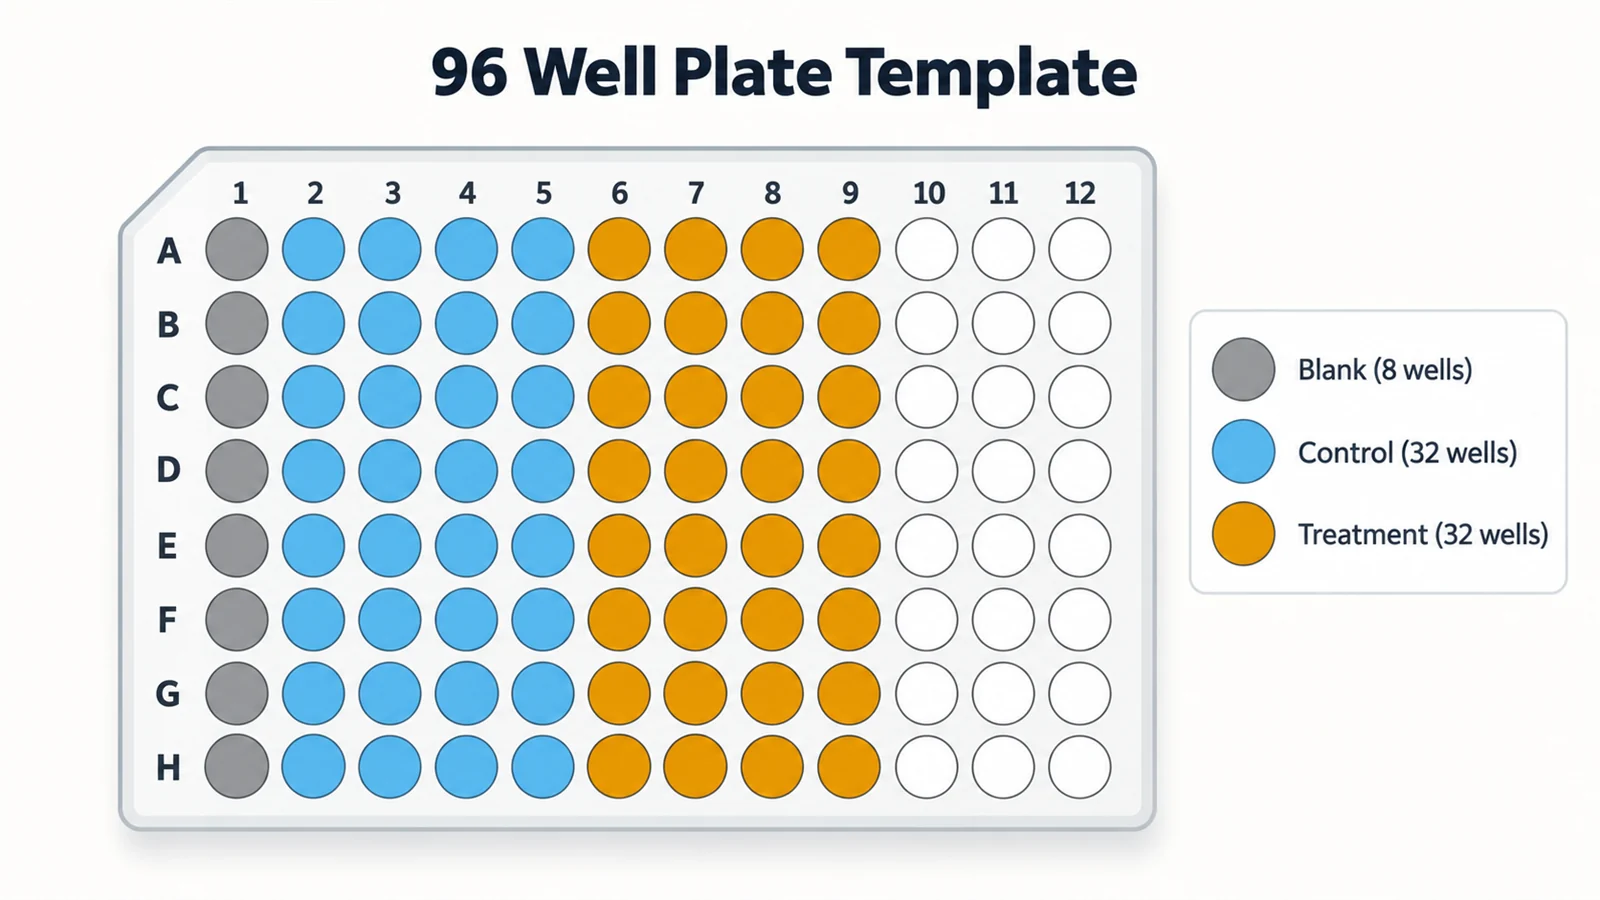
Create a lab setup diagram of a microplate absorbance assay on a white background, reading left to right. On the left, under a "Prepare samples" heading, draw six capped tubes of coloured samples and a single-channel micropipette. An arrow labeled "Dispense" leads to a 96-well plate with rows A to H and columns 1 to 12, columns 1 to 6 bracketed "Standards" and columns 7 to 12 bracketed "Samples", under an "Incubate" heading with a clock. A bracket reads "Read absorbance at 450 nm" and an arrow leads to a microplate reader with the plate in its drawer and a display reading A450. Below the plate, add an empty 8 by 12 plate map with the same row and column labels for recording the layout.
Microplate assayColour for slides
Use this example
How to make a lab setup diagram
1
Pick the setup, labels, and style
Choose a setup such as titration, distillation, filtration, gas collection, chromatography or gel electrophoresis, or describe your own. Then choose labeled, numbered with a key, a blank worksheet, or a worksheet with a word bank, and a textbook, exam-style, colour or realistic drawing.
2
Generate the apparatus
The generator draws the setup the way it is built at the bench: glassware clamped to the stand, condenser water in at the bottom, the thermometer at the side arm, and an opening on anything that is heated. It labels only the parts you ask for.
3
Make the answer key, check, and export
For a worksheet, make the answer key from the same result so the numbers match. Check the water direction, the clamps and the open outlet against the mistakes list, then download the PNG for a worksheet, lab report or slide.
Lab setup key facts
Condenser water
In at the bottom, out at the top
Distillation thermometer
Bulb just below the side arm
Distilling flask
One-third to one-half full, with boiling chips
Burette scale
0 at the top, read at the bottom of the meniscus
Titration flask
Conical flask on a white tile
Heated apparatus
Always open to the air somewhere
Chromatography baseline
Pencil, above the solvent level
Gel electrophoresis
DNA moves toward the positive (red) electrode
Water electrolysis
H2 at the cathode, O2 at the anode, 2 : 1 by volume
Bunsen flame for heating
Blue, with the air hole open
What is a lab diagram?
A lab diagram, or laboratory diagram, is a labeled drawing of the apparatus for an experiment: what each vessel is, how the pieces connect, what holds them up, where the heat comes from, and which way liquids and gases flow. It is the figure that goes in the method section of a lab report, on a practical worksheet, and in the apparatus questions of science exams.
A good lab setup diagram is a working plan, not a picture of glassware. Someone should be able to build the setup from it, and nothing in it should be impossible or unsafe. That is the standard this lab diagram maker draws to, whether you ask for one titration or a sheet of science lab diagrams for a whole unit.
Four rules every lab setup diagram should pass
Most wrong lab diagrams fail one of these. They are also the first things a teacher marks in a drawn apparatus answer.
Supported: every item stands on the bench, sits in something, or is clamped to a retort stand. A round-bottom flask never stands on its own.
Open when heated: anything heated has an opening, such as an open condenser top, an open receiver or a delivery tube. A sealed, heated system builds pressure until something gives.
Flowing the right way: condenser water in at the bottom and out at the top; vapour toward the condenser; gas toward the collecting vessel.
Named correctly: each piece of glassware has the shape that matches its label, and each label points at exactly one thing.
Titration setup diagram: what to draw and label
A titration measures how much of one solution reacts exactly with a known volume of another. The diagram is simple, but every part has a reason.
Burette: a long graduated tube with a tap, clamped vertically. It reads 0 at the top and the numbers increase downward, because it measures the volume that has run out. Read it at eye level at the bottom of the meniscus.
Retort stand and burette clamp: hold the burette upright without crushing it.
Conical flask: holds the volume measured out with a volumetric pipette, plus a few drops of indicator. Its sloping sides let you swirl it without splashing.
White tile: under the flask, so the colour change at the end point is easy to see.
Filling funnel: used to fill the burette, then taken off before the titration starts so drips from it do not change the reading.
Simple distillation, fractional distillation, and reflux
These three setups share most of their glassware, which is why they are so often drawn wrong.
Simple distillation separates a liquid from a dissolved solid, or two liquids with very different boiling points. Flask, still head, thermometer at the side arm, a condenser sloping down, and an open receiver.
Fractional distillation adds a vertical fractionating column, packed with glass beads or rings, between the flask and the still head. It separates liquids with closer boiling points, such as ethanol and water.
Heating under reflux puts the condenser vertically on top of the flask, open at the top, so vapour condenses and runs back down. Nothing is collected; it lets a reaction mixture boil for a long time without losing solvent.
In all three, the cooling water goes in at the bottom of the condenser jacket and out at the top, the flask is clamped at the neck, and it holds anti-bumping granules or a stirrer bar so it boils smoothly.
Filtration and evaporation diagrams
Filtration separates an insoluble solid from a liquid. The filter paper is folded into a cone and sits inside a filter funnel, which is held in a filter stand or ring clamp over a conical flask or beaker. The liquid that passes through is the filtrate; the solid left in the paper is the residue. Keep the liquid level below the top of the paper and let the funnel stem touch the inside of the receiving vessel so the filtrate runs down the wall without splashing. If the dissolved solid is wanted, the next diagram is an evaporating basin heated gently, over a water bath or on a tripod and gauze, until crystals start to form. For faster filtration under reduced pressure, the funnel becomes a Büchner funnel sitting in a thick-walled side-arm flask connected to a vacuum line.
Collecting a gas: over water, by syringe, or by delivery
How a gas is collected depends on how soluble it is and how dense it is compared with air.
Over water: for gases that do not dissolve much, such as hydrogen and oxygen. The delivery tube ends under an inverted gas jar or measuring cylinder that started full of water, usually standing on a beehive shelf, and the gas pushes the water out.
Gas syringe: measures the volume directly. The delivery tube connects to the syringe and the plunger moves out as gas arrives, which suits rate-of-reaction experiments.
Upward delivery (downward displacement of air): for gases less dense than air, collected in an inverted jar.
Downward delivery (upward displacement of air): for gases denser than air, such as carbon dioxide and chlorine, collected in an upright jar.
In every version the reaction flask is closed by a bung with the delivery tube through it, and a thistle funnel stem dips below the liquid, so the only way out for the gas is the delivery tube.
Heating setups: Bunsen burner, tripod, water bath, heating mantle
Bunsen burner: with the air hole open the flame is blue and hot, and this is the flame used for heating. With the air hole closed it gives the yellow safety flame, which is easy to see when the burner is not in use.
Tripod and gauze: a beaker or evaporating basin sits on a wire gauze over a tripod, with the burner underneath and a heatproof mat under everything.
Water bath: for gentle heating up to about 100 °C, and for anything flammable.
Heating mantle: the safe way to heat a round-bottom flask of organic liquid, because there is no flame.
Test tube: held in a test tube holder at an angle and heated gently, with the mouth pointing away from everyone.
Chromatography setup diagrams
For paper chromatography or thin-layer chromatography (TLC), the sample spots go on a baseline drawn in pencil, because graphite does not move with the solvent and ink would. The paper or plate stands in a shallow layer of solvent whose surface is below the baseline, otherwise the spots dissolve into the solvent instead of travelling up. The container is covered so it stays saturated with solvent vapour. When the solvent has nearly reached the top, the plate is taken out and the solvent front is marked straight away in pencil. A diagram for calculating Rf values should show the baseline, the solvent front, and the distance from the baseline to the centre of each spot.
Gel electrophoresis setup diagram
Agarose gel electrophoresis separates DNA fragments by size. The diagram shows a horizontal gel box with the gel submerged in buffer, wells near one end, and two leads to a power supply. DNA is negatively charged, so the wells sit at the negative (black) electrode and the fragments travel toward the positive (red) electrode, the smallest fastest. A DNA ladder of known sizes runs in the first lane so the other bands can be sized. A diagram that puts the wells next to the red lead is the classic error here; it would run the samples straight out of the gel.
Common lab glassware and how to tell it apart
An equipment identification sheet is often the first lab diagram students meet. The shapes are what give each piece away.
Beaker: straight sides and a pouring lip; rough volumes only.
Conical (Erlenmeyer) flask: sloping sides and a narrow neck; for swirling, titrations and reactions.
Round-bottom flask: spherical; for heating evenly, always clamped or seated in a mantle.
Volumetric flask: round bulb, long thin neck, one ring mark; holds one exact volume.
Measuring cylinder: tall and graduated, on a foot; quicker but less accurate than a burette or pipette.
Burette and volumetric pipette: the accurate pair for titrations. A burette delivers any volume read off its scale; a volumetric pipette delivers one fixed volume to its ring mark.
Test tube and boiling tube: a boiling tube is wider and made of thicker glass, for heating.
2D exam-style or 3D: which kind of lab diagram to draw
Exam boards and most lab manuals expect apparatus as flat, two-dimensional section drawings: outlines only, a line for each liquid level, no perspective. They are quick to draw, easy to read, and leave no doubt about how pieces connect, so choose Exam-style 2D for revision sheets and practical write-ups. Textbook line art adds light shading and colour for handouts. The realistic style suits posters, outreach and slides where the apparatus should look like the real thing, but keep its labels just as plain.
Making a lab diagram worksheet and its answer key
Name the setup: a single titration or distillation tests how apparatus connects; the lab equipment sheet tests glassware names.
Choose Blank worksheet for a test or Worksheet with word bank for a scaffolded lesson. The word bank is alphabetical, so its order gives nothing away.
Make the answer key from the same result with the answer-key action, so every number lines up.
Mix in a deliberate error for older students: generate a correct setup, then ask AI Drawing to reverse the condenser water, and ask the class to find the fault.
Putting a lab diagram in a lab report
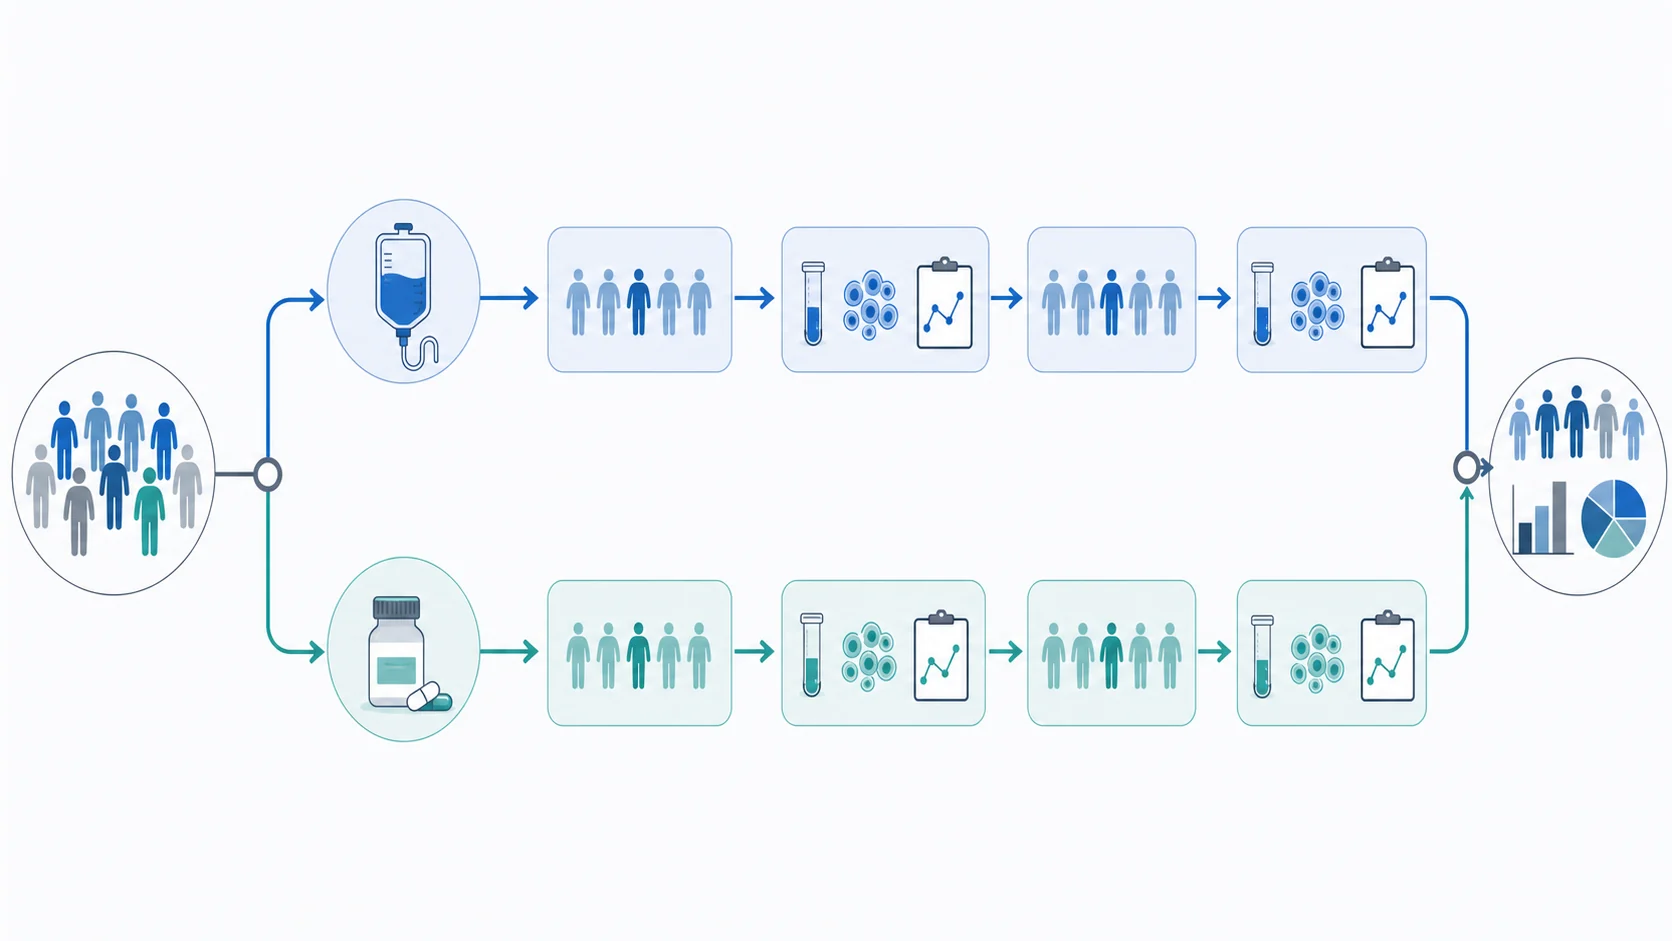
In a lab report the apparatus diagram belongs in the method section, numbered and captioned, for example "Figure 1. Apparatus used to collect hydrogen over water." Label only what a reader needs to repeat the experiment, keep the drawing two-dimensional and uncluttered, and make sure the text and the figure describe the same apparatus, with the same names. The plan of the experiment, meaning the variables, groups and measurements, is a different figure; make that one with the experimental design diagram page.
Most common mistakes on a lab diagram
These are the errors image models make most often when they draw lab apparatus. Every one of them would fail a practical, so check each before a diagram goes into a worksheet or a report.
MistakeCorrect
MistakeCondenser water entering at the top
CorrectWater in at the lower inlet, out at the upper outlet
MistakeDistillation thermometer dipping into the boiling liquid
CorrectBulb just below the side arm, in the vapour
MistakeA stopper in a heated flask, or a receiver sealed onto the condenser
CorrectHeated apparatus stays open to the air: open receiver, vented adapter or open condenser top
MistakeA round-bottom flask standing on the bench or on a flat hot plate, unclamped
CorrectClamped at the neck and heated in a mantle or bath
MistakeThistle funnel stem ending above the liquid in the flask
CorrectThe stem dips below the liquid, so gas leaves only through the delivery tube
MistakeBurette numbered from the bottom
CorrectReads 0 at the top, increasing downward
MistakeChromatography baseline in ink, or below the solvent
CorrectPencil baseline above the solvent level, tank covered
MistakeGel wells next to the red electrode
CorrectWells at the negative (black) end; DNA runs to red
MistakeEqual volumes of hydrogen and oxygen in water electrolysis
CorrectHydrogen at the cathode is twice the volume of oxygen at the anode
MistakeA beaker labeled as a flask, or a measuring cylinder as a burette
CorrectEach piece drawn with its own shape and given its own name
Lab diagram vs microscope, chemistry, and experimental design diagrams
Four kinds of figure get called a lab diagram. This is what each of our generators draws, so you can pick the right one.
Lab diagram (this page)
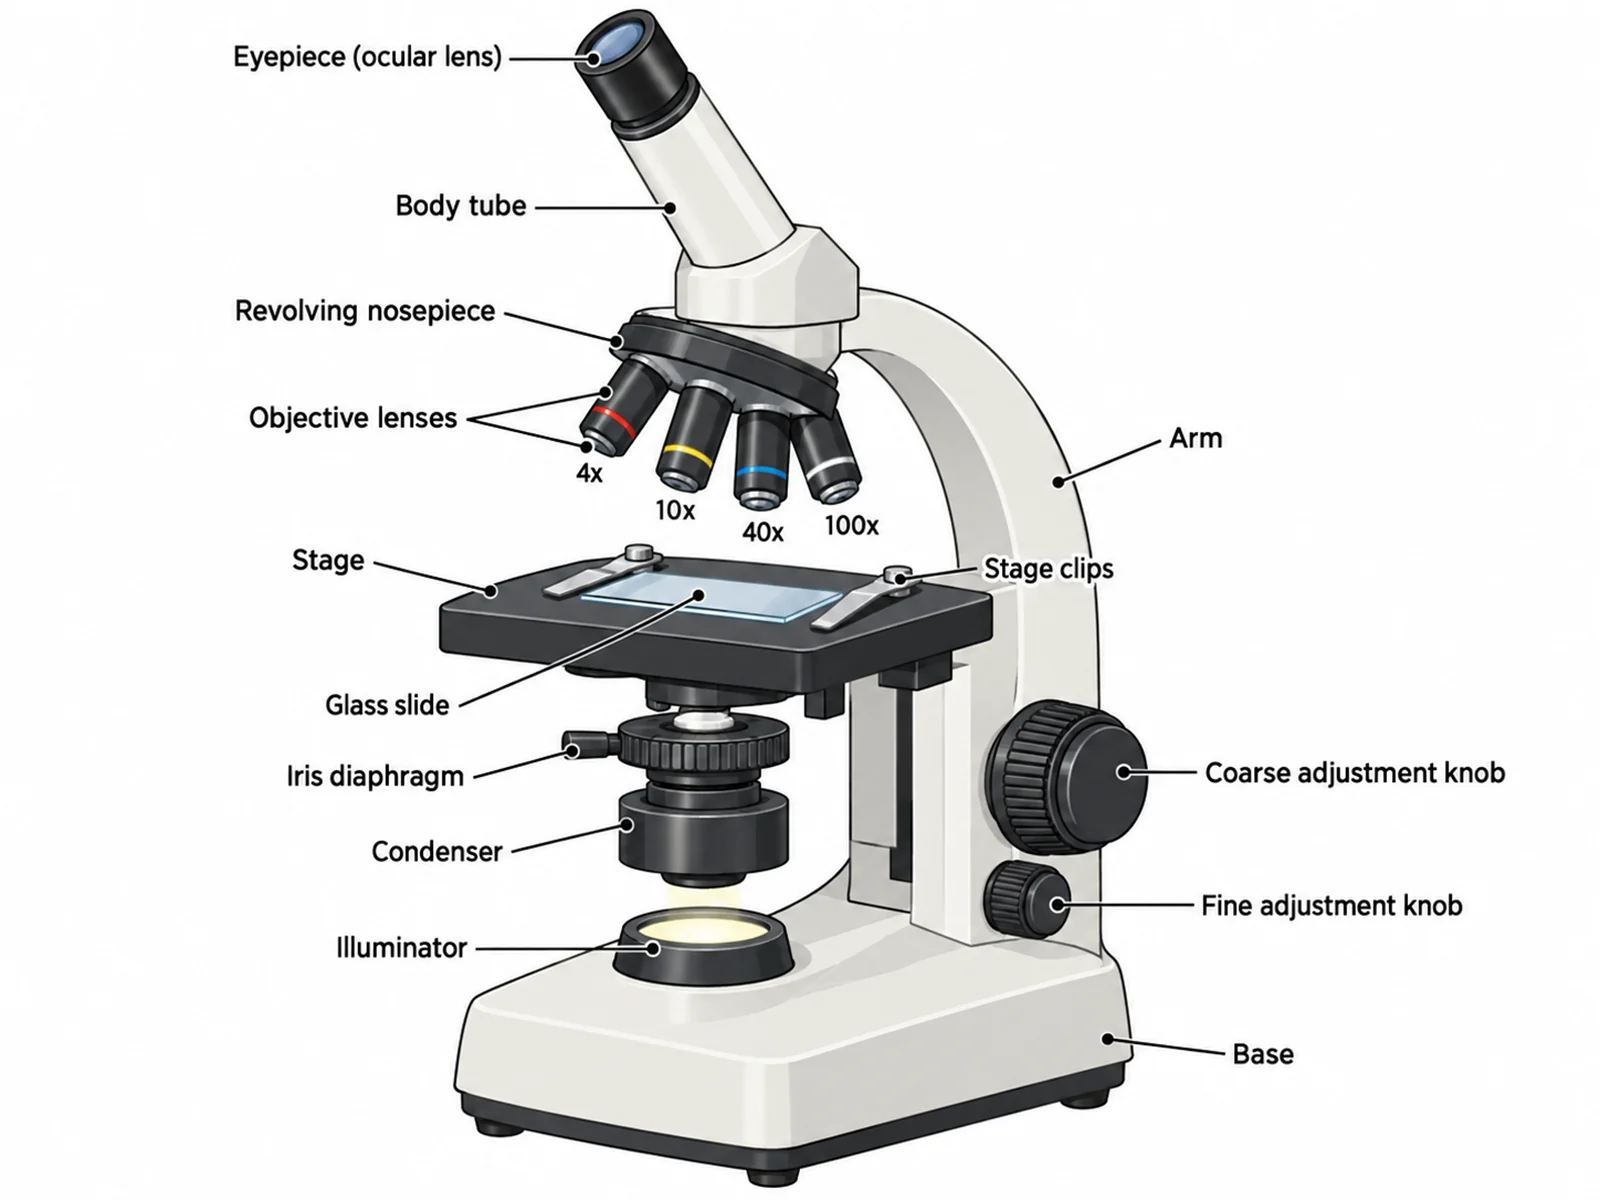
Microscope diagram
Chemistry diagram
Experimental design diagram
What it draws
The physical setup on the bench: glassware, stands, clamps, heat sources and connections
One instrument, the compound light microscope, part by part
Chemistry content: mechanisms, energy diagrams, titration curves, structures
The plan of a study: variables, groups, controls, randomization and timeline
Typical labels
Burette, condenser, delivery tube, water in, filtrate
Eyepiece, objective lenses, stage, condenser, fine adjustment knob
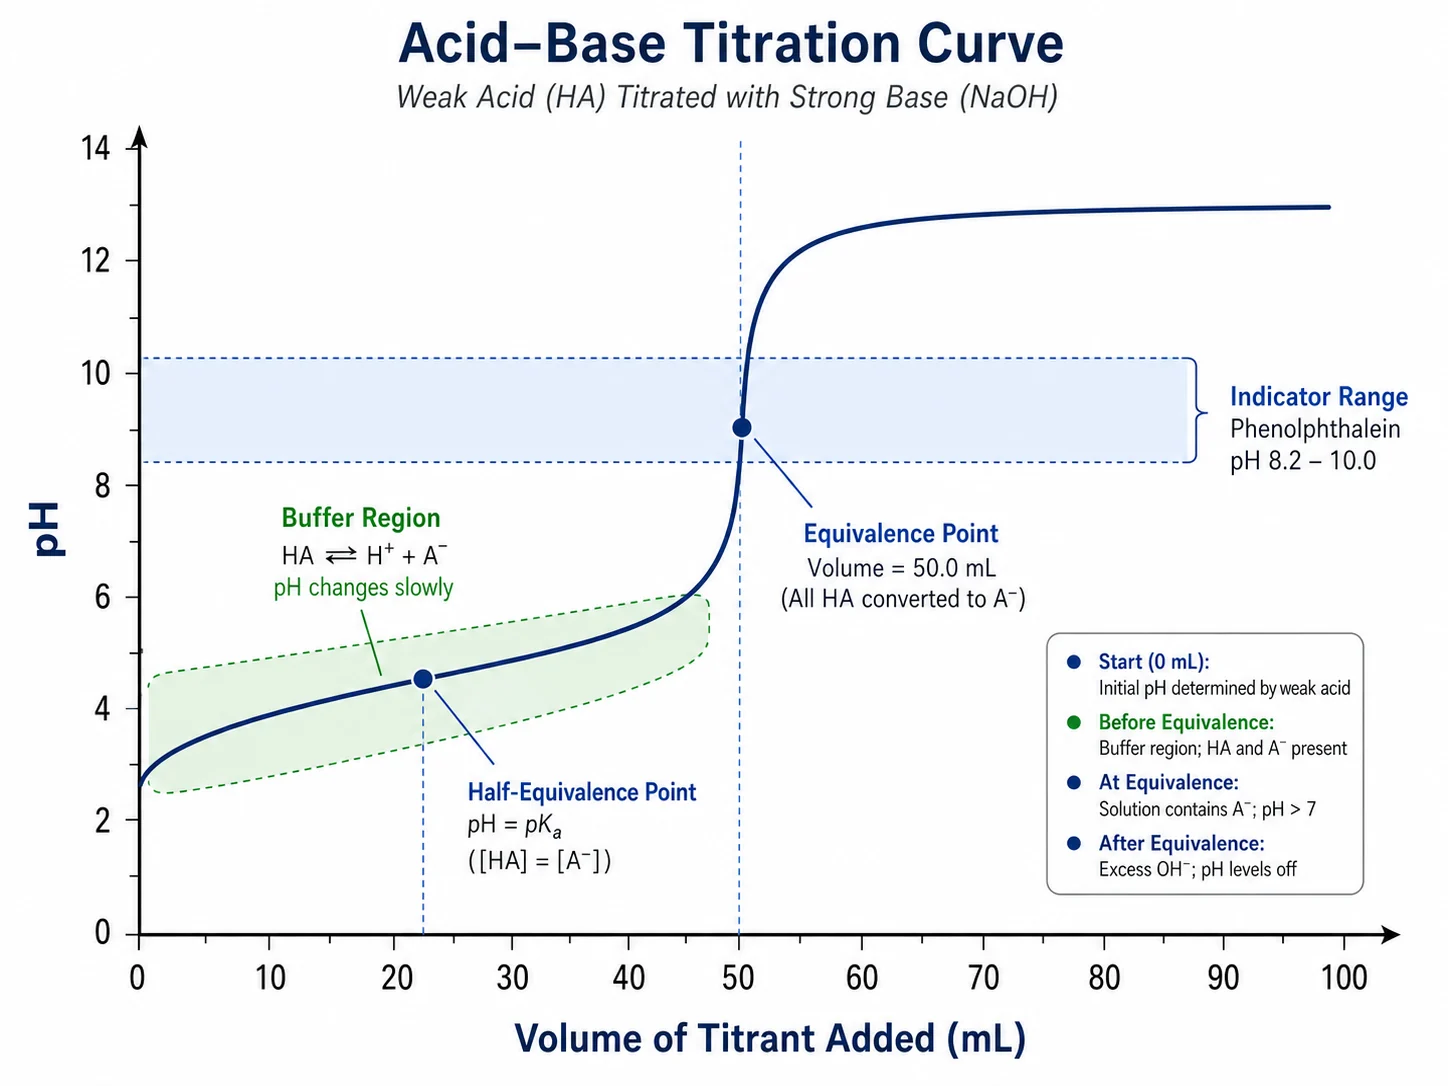
Reactants, transition states, curly arrows, equivalence point
Independent and dependent variables, control group, replicates
Science-fair boards, lab reports, grant and paper methods figures
What to check
Water direction, clamps, open outlets, glassware shapes
Light source below the stage, two focus knobs
Arrow direction, charges, axis labels
Which variable is manipulated, group sizes, measurement times
Lab Diagram Maker FAQ
It is a generator that draws laboratory apparatus from a description: a titration, a distillation, a filtration, a gas being collected, a chromatography tank, a gel electrophoresis box, or a sheet of glassware to identify. You name the setup and the parts to label, and it returns a clean figure with leader lines. This one also checks the setup against lab practice, so condensers, clamps, heat sources and gas outlets are drawn the way they would be built.
Generate microscope diagrams, chemistry figures, experimental design diagrams, and blank labeling worksheets with matching answer keys with the same SciFigure AI workflow.