Respiratory System Diagram AI

Respiratory System Diagram Generator

Generate a labeled respiratory system diagram from the nasal cavity down to the alveoli, or a blank diagram of the respiratory system for students to label. Describe the parts and the style you need, then download a clean figure for worksheets, revision notes, and slides.

Labeled and blankTrachea to alveoliWorksheet-ready

AI Respiratory System Diagram Generator

Describe which parts to label, or ask for a blank version to label in class.

Costs 5 credits464 / 2000 characters

Generate a publication-ready PNG from your description.

Preview

Respiratory System Diagram Example Previews

Target aspect ratio: 3:4

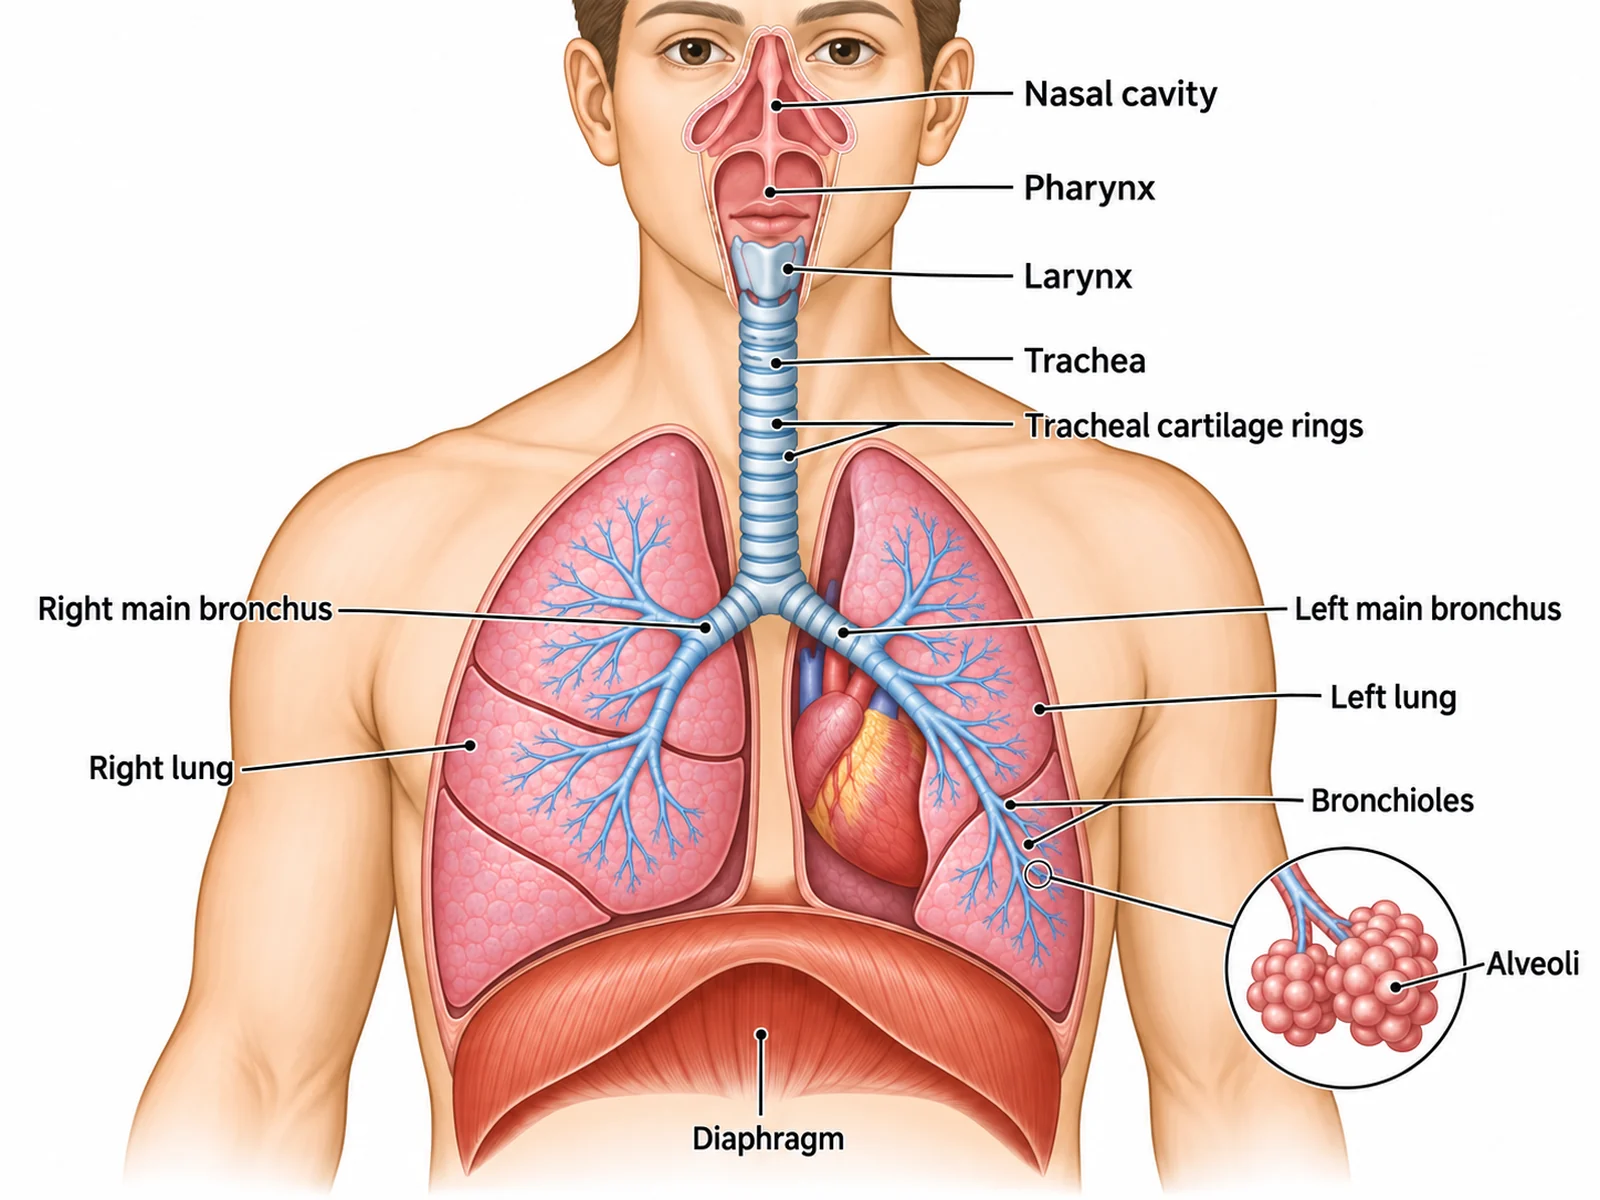
Labeled respiratory system diagram naming the nasal cavity, pharynx, larynx, trachea, bronchi, bronchioles, alveoli, both lungs, and the diaphragm
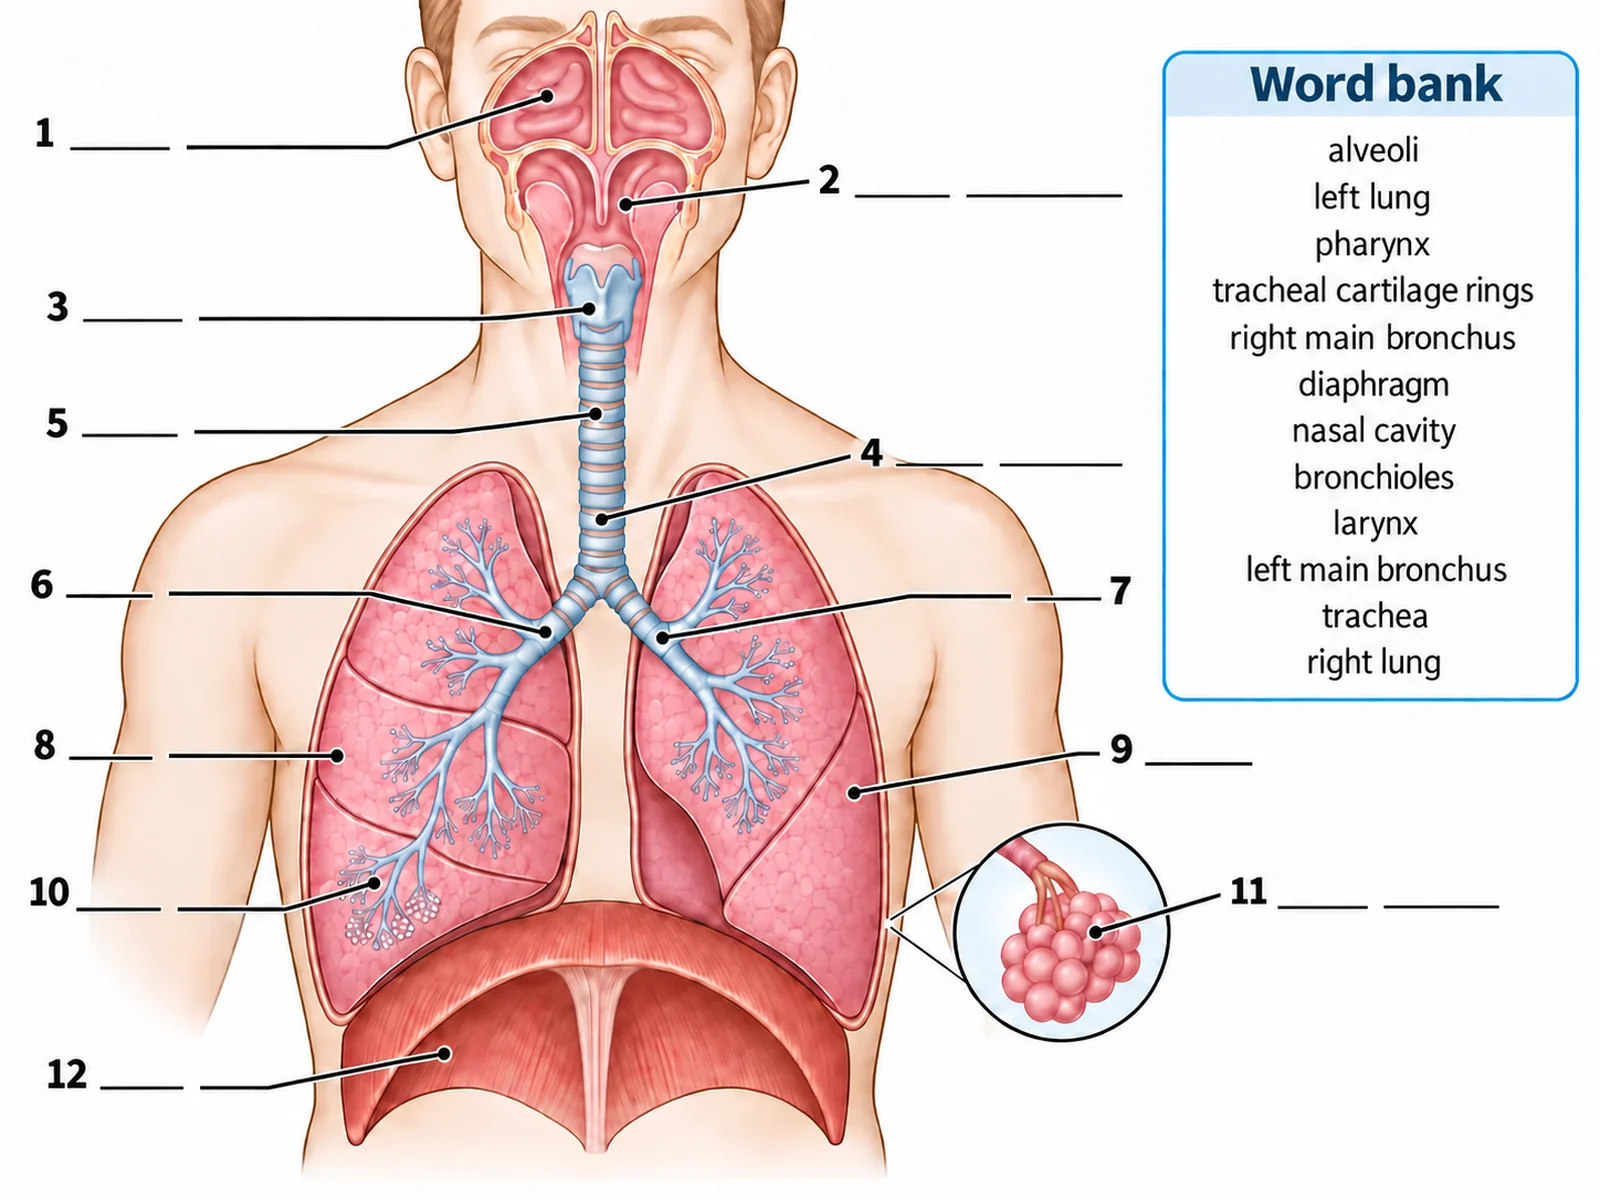
Blank unlabeled respiratory system diagram with numbered empty label lines and a word bank for students to complete
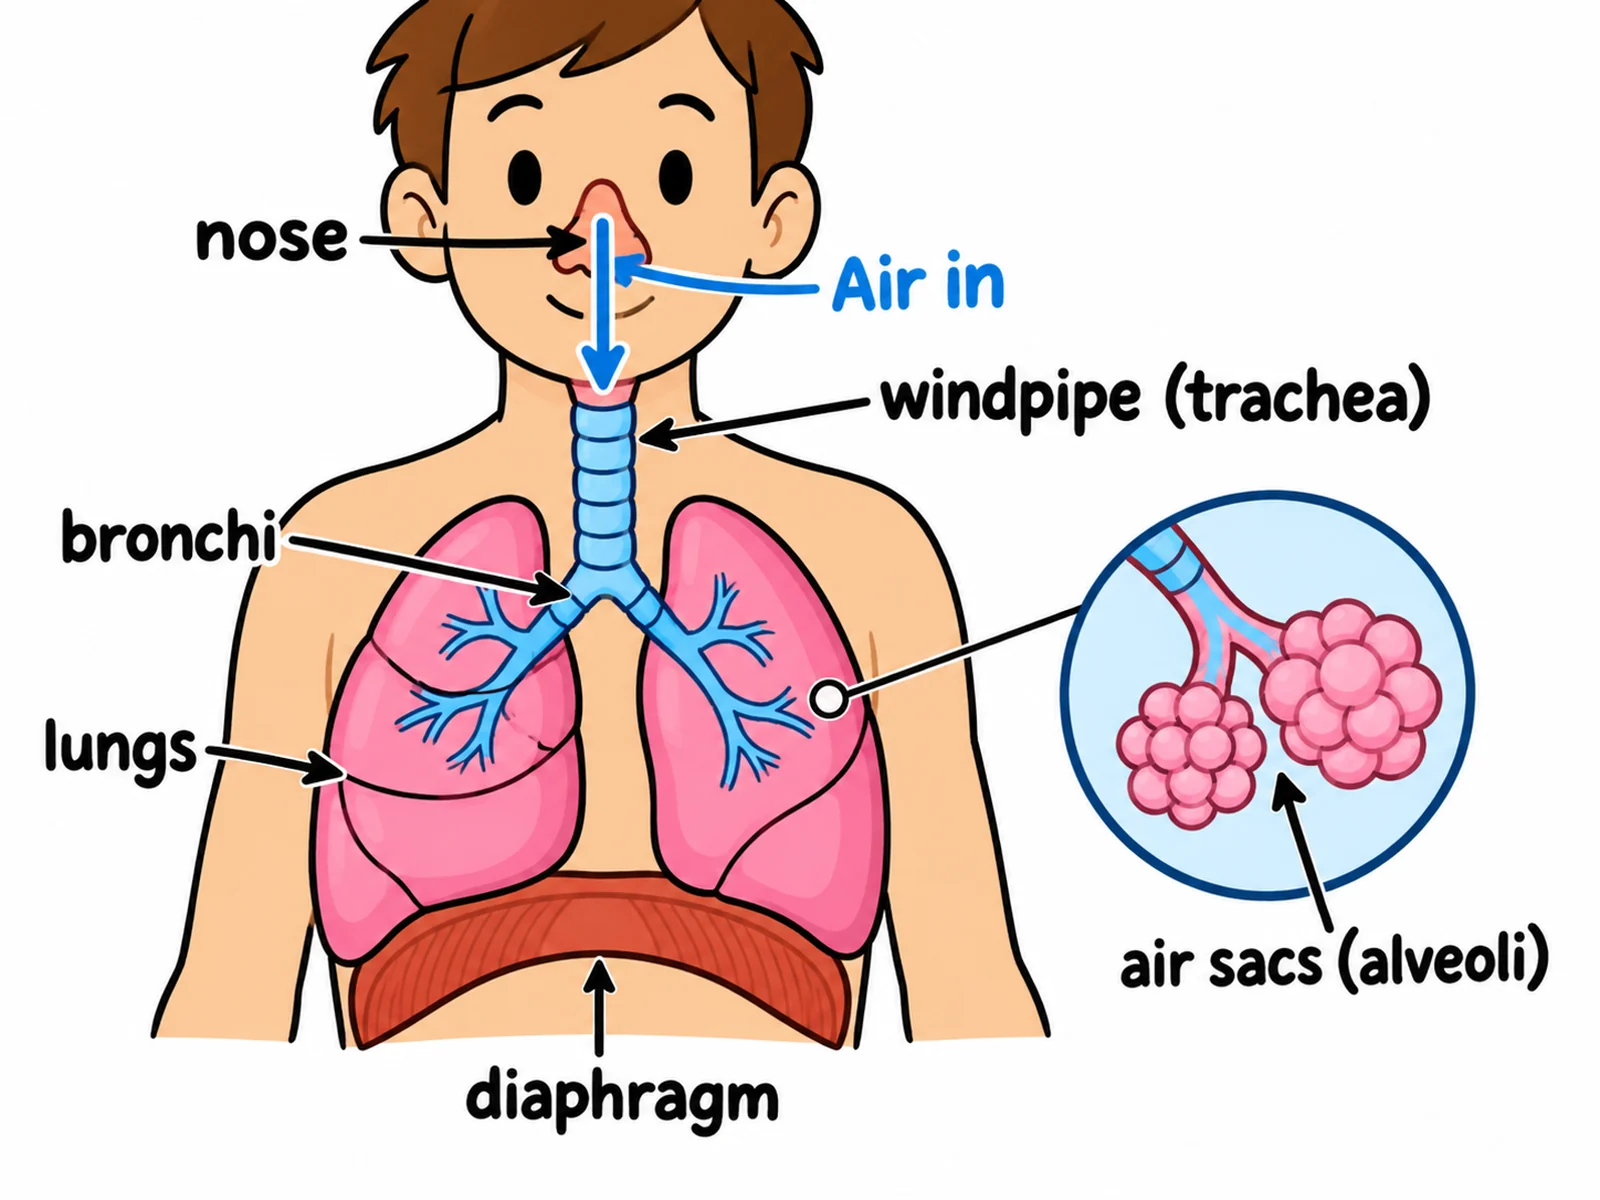
Simple respiratory system drawing for younger students labeling only the nose, windpipe, bronchi, lungs, air sacs, and diaphragm

Sample previews. Describe your diagram to generate your own respiratory figure.

Respiratory System Diagram Examples

Use these as visual directions for labeled anatomy, blank worksheets to label, simple versions for younger classes, alveoli close-ups, and breathing mechanics.

Labeled respiratory system diagram naming the nasal cavity, pharynx, larynx, trachea, bronchi, bronchioles, alveoli, both lungs, and the diaphragm

Prompt

Create a fully labeled human respiratory system diagram on a white background, drawn as a front-facing view of the head and chest. Trace the airway from the nasal cavity down through the pharynx, larynx, and trachea, then split it into a right and a left main bronchus, branching bronchioles, and a cluster of alveoli shown in a magnified callout circle. Draw the lungs asymmetrically: the three-lobed right lung on the VIEWER’S LEFT with a horizontal and an oblique fissure, and the two-lobed left lung on the viewer’s right with a cardiac notch cut into it. Show the C-shaped cartilage rings on the trachea and a dome-shaped diaphragm beneath both lungs. Label exactly these twelve targets with thin leader lines and readable dark sans-serif text: "Nasal cavity", "Pharynx", "Larynx", "Trachea", "Tracheal cartilage rings", "Right main bronchus", "Left main bronchus", "Bronchioles", "Alveoli", "Right lung", "Left lung", and "Diaphragm".
Labeled Respiratory System

Blank unlabeled respiratory system diagram with numbered empty label lines and a word bank for students to complete

Prompt

Create a blank respiratory system worksheet for students to label. Draw the same front-facing airway and lungs in clean line art with pale uniform fills and no answer labels on the anatomy: nasal cavity, pharynx, larynx, trachea with C-shaped rings, right and left main bronchi, bronchioles, an alveoli cluster in a callout circle, both lungs (three lobes on the viewer’s left, two lobes and a cardiac notch on the viewer’s right), and the diaphragm below. Draw exactly twelve thin leader lines from the twelve targets to short horizontal ruled blanks, numbered 1 to 12. Add a word bank box underneath reading exactly "alveoli, left lung, pharynx, tracheal cartilage rings, right main bronchus, diaphragm, nasal cavity, bronchioles, larynx, left main bronchus, trachea, right lung". Generous white space, no answer key.

Blank Respiratory System to Label

Simple respiratory system drawing for younger students labeling only the nose, windpipe, bronchi, lungs, air sacs, and diaphragm

Prompt

Create a simple, easy-to-draw respiratory system diagram for primary or lower-secondary students. Label only six things in large readable text: nose, windpipe (trachea), bronchi, lungs, air sacs (alveoli), and diaphragm. Use bold flat colours with thick dark outlines and plenty of white space. Keep the lungs asymmetric — three lobes on the viewer’s left and two on the viewer’s right — but omit the pharynx, larynx, pleura, and rib cage. Add one downward arrow through the windpipe labeled "Air in" and place a small inset showing air sacs at the end of the smallest tubes.

Simple Respiratory System Drawing

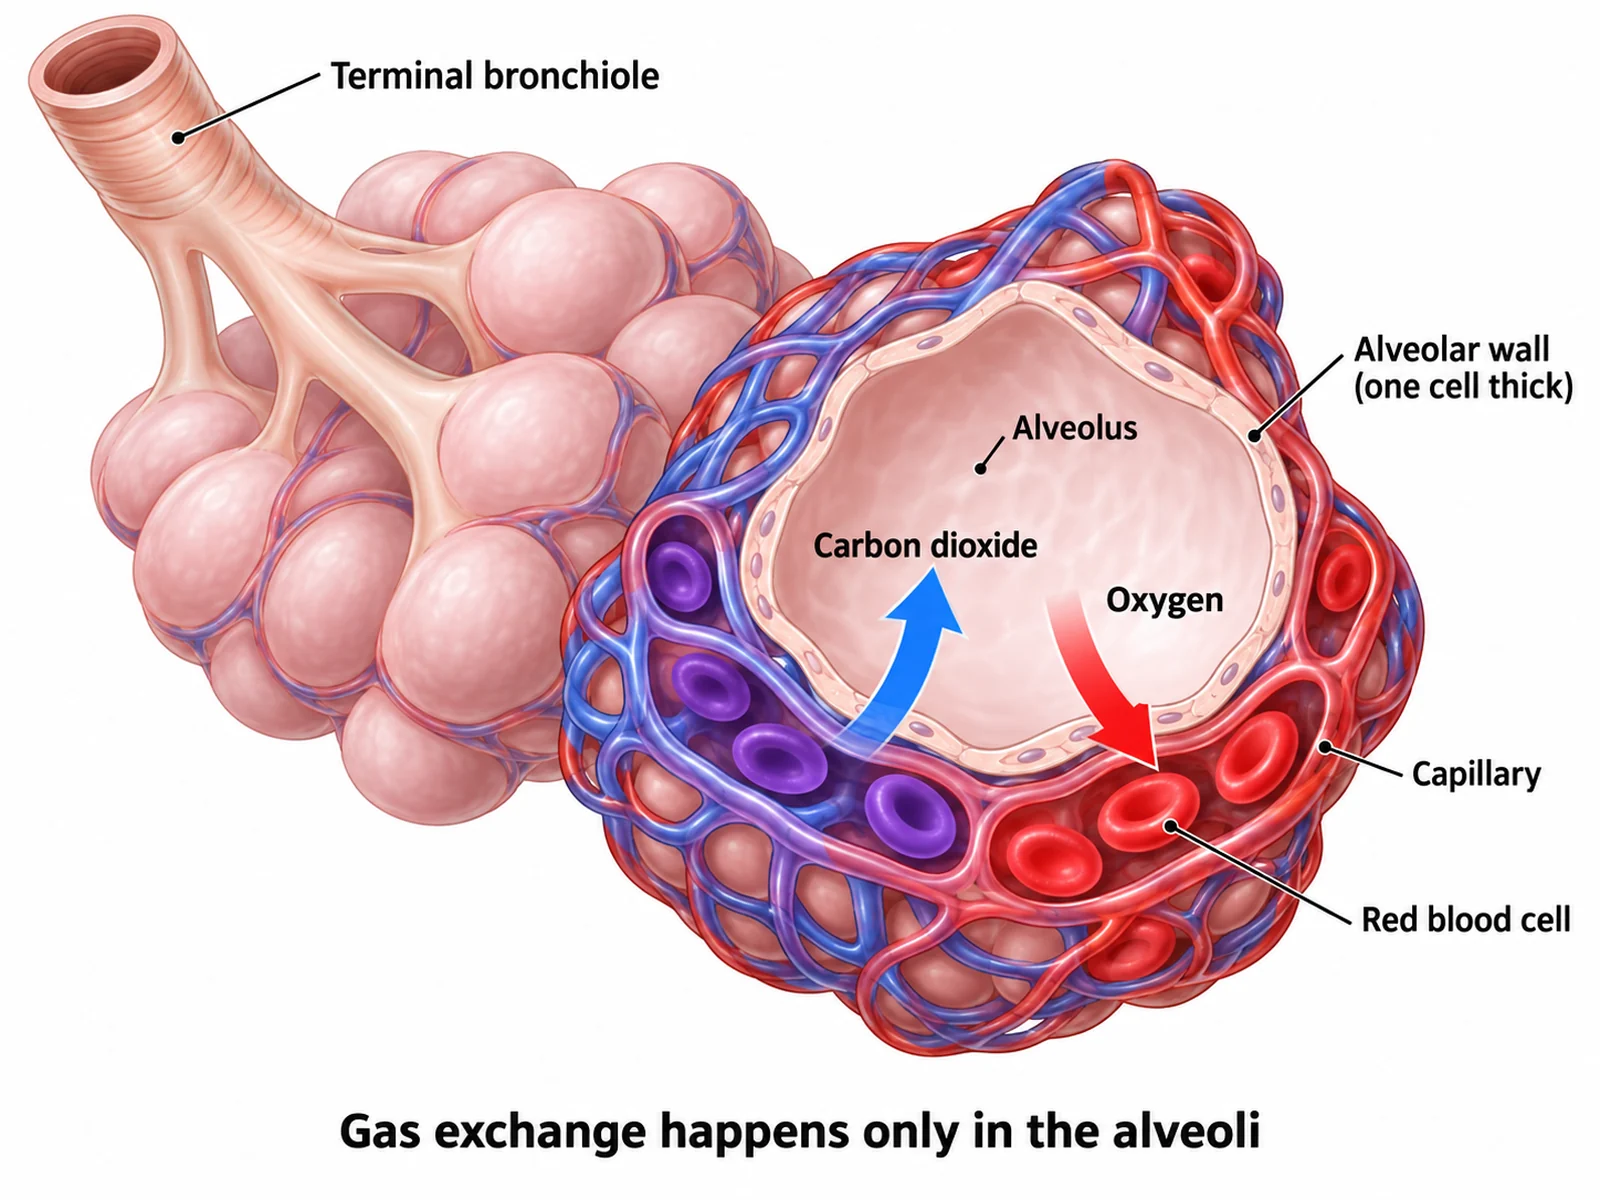
Magnified alveoli diagram showing a capillary network with oxygen diffusing into the blood and carbon dioxide diffusing out

Prompt

Create a magnified, labeled alveoli gas exchange diagram on a white background. Draw a terminal bronchiole opening into a grape-like cluster of alveoli, with one alveolus cut away so its wall, one cell thick, is visible. Wrap that alveolus in a dense capillary network carrying red blood cells, drawn blue-purple on the way in and bright red on the way out. Add exactly two diffusion arrows across the alveolar wall, pointing in opposite directions: "Oxygen" moving from the air inside the alveolus into the blood, and "Carbon dioxide" moving from the blood into the alveolus. Label alveolus, alveolar wall (one cell thick), capillary, red blood cell, and terminal bronchiole, and add a caption reading "Gas exchange happens only in the alveoli".

Gas Exchange at the Alveoli

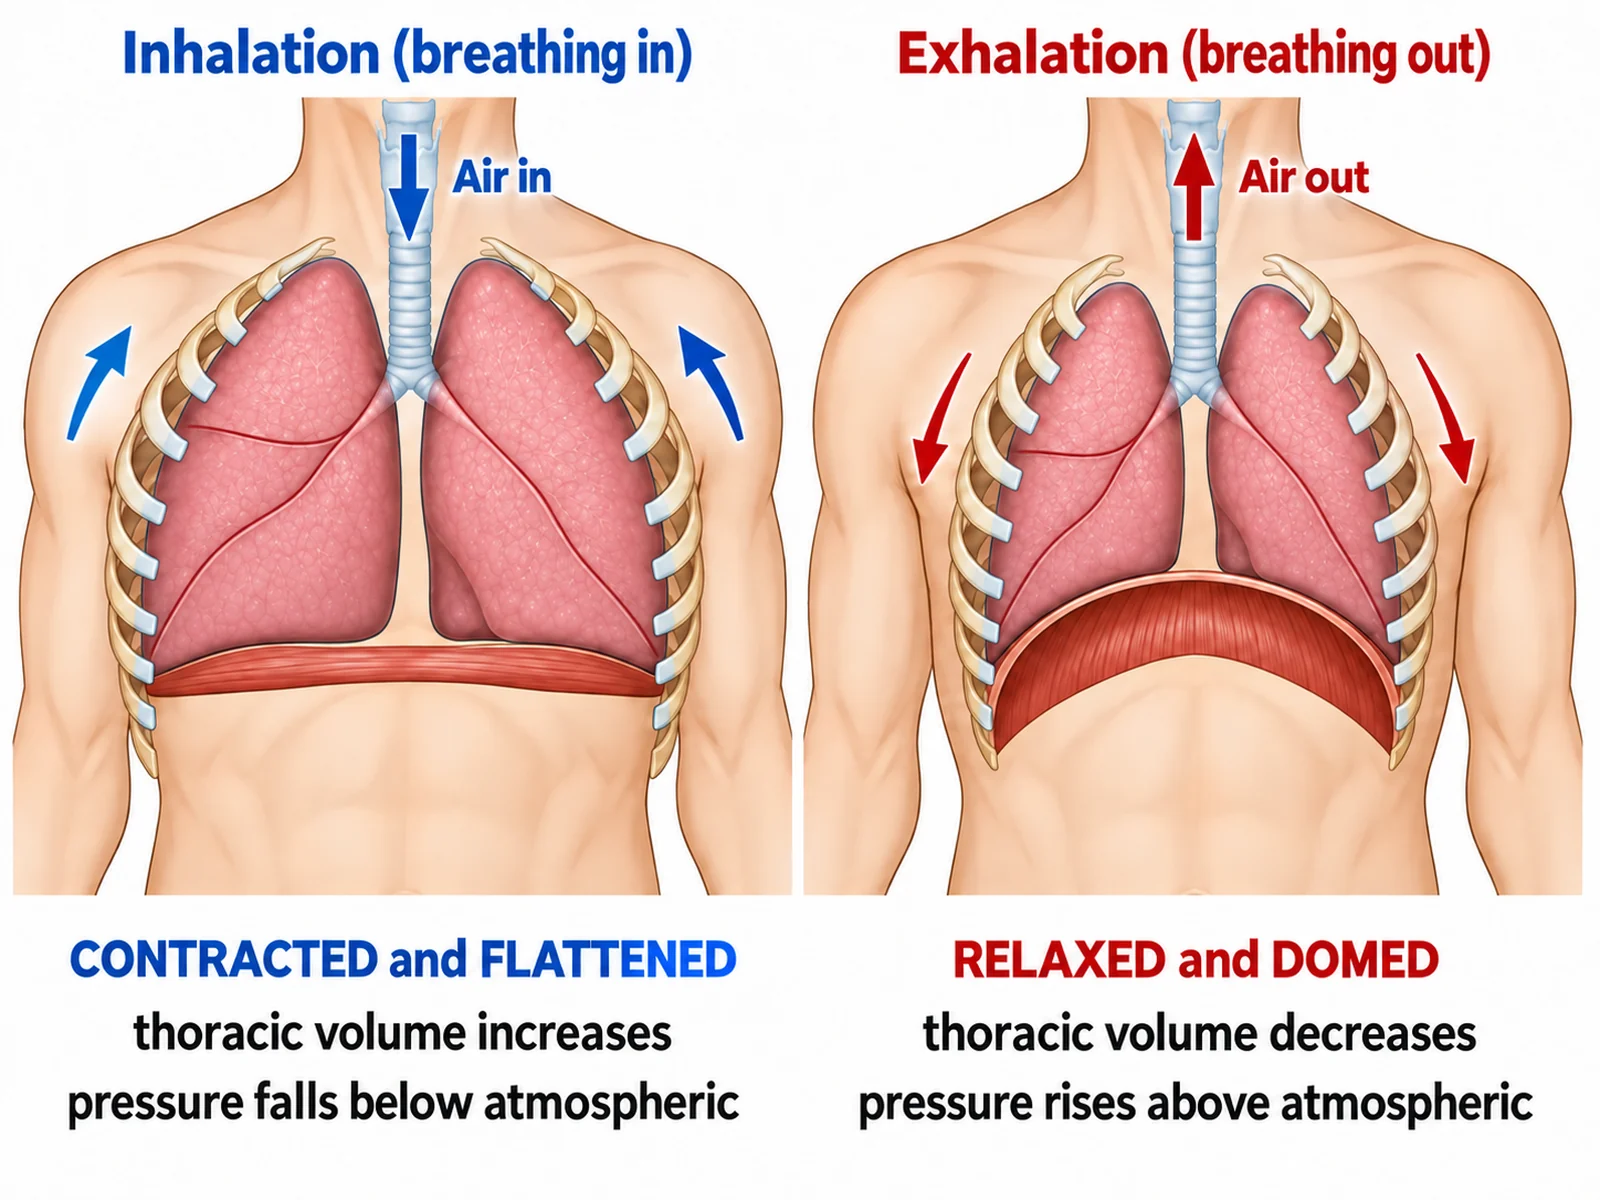
Two-panel breathing mechanism diagram contrasting a flattened contracted diaphragm during inhalation with a domed relaxed diaphragm during exhalation

Prompt

Create a two-panel breathing mechanism diagram, side by side on a white background, using the same torso outline in both panels so they are easy to compare. Head the left panel "Inhalation (breathing in)": the diaphragm CONTRACTED and FLATTENED into a nearly straight sheet, the rib cage lifted up and outward, the lungs expanded, with captions "thoracic volume increases" and "pressure falls below atmospheric", and a downward arrow through the trachea labeled "Air in". Head the right panel "Exhalation (breathing out)": the diaphragm RELAXED and DOMED upward, the ribs dropped down and in, the lungs smaller, with captions "thoracic volume decreases" and "pressure rises above atmospheric", and an upward arrow labeled "Air out".

Breathing In and Breathing Out

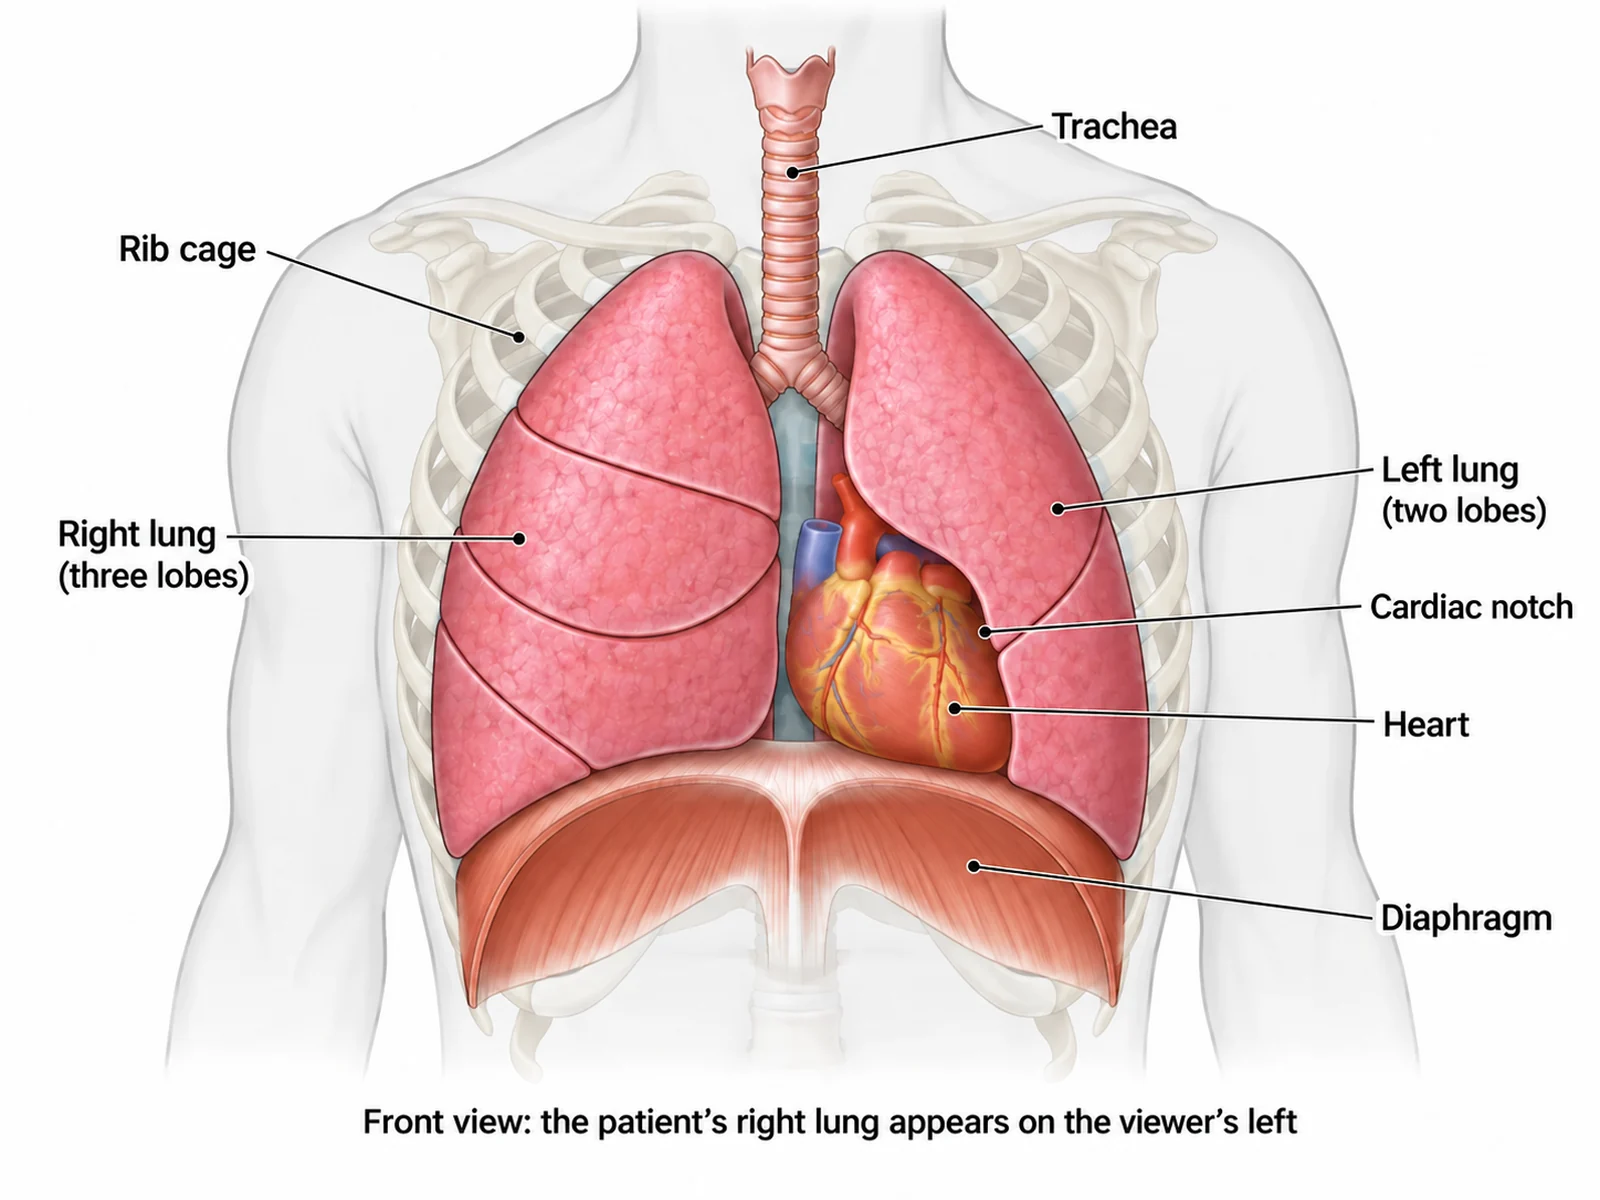
Front-facing torso diagram showing the lungs in position with the heart in the cardiac notch of the two-lobed left lung

Prompt

Create a labeled diagram showing the respiratory system in position inside the human body. Draw a full front-facing torso outline in pale grey with the rib cage lightly sketched behind, then render the airway and lungs in saturated colour on top. Place the three-lobed right lung on the VIEWER’S LEFT of the frame and the two-lobed left lung on the viewer’s right, with the heart drawn sitting in the cardiac notch so it is obvious why the left lung is the smaller one. Label trachea, right lung (three lobes), left lung (two lobes), cardiac notch, heart, diaphragm, and rib cage, and add a caption reading "Front view: the patient’s right lung appears on the viewer’s left".

Respiratory System in the Body

How to make a labeled or blank respiratory system diagram

1

Choose the view and the parts

A front-facing anatomical view of the whole system, a magnified alveolus for gas exchange, or a two-panel breathing mechanism. List the parts your syllabus requires and say whether you want them labeled or left blank.

2

Generate the diagram

The generator traces the airway from nasal cavity to alveoli, gives the right lung three lobes and the left two, and adds clean leader lines with readable text — or empty numbered lines for a worksheet.

3

Check the anatomy, then export

Confirm the three-lobed lung sits on the viewer’s left, the gas-exchange arrows are at the alveoli only, and the diaphragm is flattened for inhalation, then download the PNG for a worksheet, slide, or revision sheet.

What is a respiratory system diagram?

A respiratory system diagram is a labeled map of the organs that move air into the body and swap oxygen for carbon dioxide. It is normally drawn from the front of the patient, following the airway from the nasal cavity down the trachea, into the bronchi, along the bronchioles, and out into the alveoli, with the lungs, rib cage, and diaphragm around it. The same figure is used two ways in class: fully labeled as a reference, and as a blank diagram of the respiratory system with numbered empty lines that students complete themselves.

Parts of the respiratory system

  • Nasal cavity: warms, moistens, and filters incoming air before it travels any further.
  • Pharynx and larynx: the shared throat passage and the voice box; the epiglottis folds over the larynx during swallowing so food goes to the oesophagus, not the airway.
  • Trachea: the windpipe, held permanently open by C-shaped rings of cartilage that are incomplete at the back where it lies against the oesophagus.
  • Bronchi: one main bronchus enters each lung and then divides repeatedly inside it.
  • Bronchioles: the narrow branching tubes that carry air to the end of the tree; like the trachea and bronchi, they only conduct air.
  • Alveoli: tiny thin-walled sacs wrapped in capillaries, and the only place in the body where gas exchange happens.
  • Lungs: the right lung has three lobes, the left has two and a cardiac notch where the heart rests against it.
  • Diaphragm and intercostal muscles: the muscles that change the volume of the thorax and drive breathing.

How breathing works

  • Inhalation: the diaphragm contracts and flattens, the intercostal muscles pull the ribs up and out, thoracic volume increases and pressure falls below atmospheric, so air flows in.
  • Exhalation: the diaphragm relaxes and domes upward, the ribs drop down and in, volume decreases and pressure rises, so air flows out.
  • At the alveoli: oxygen diffuses from the air in the alveolus across a wall one cell thick into the blood, and carbon dioxide diffuses the other way, from the blood into the alveolus.
  • In the blood: oxygen is carried by haemoglobin in red blood cells to respiring tissues, and the carbon dioxide they produce is carried back to the lungs to be breathed out.

Common errors to check before you print

  • Both lungs given the same number of lobes. The right lung has three, the left has two — this is the single most common mistake on this figure, and the easiest to check.
  • The lungs mirrored. The diagram is a front view, so the patient’s right lung — the three-lobed one — belongs on the viewer’s left of the frame.
  • Gas exchange shown along the airways. Oxygen and carbon dioxide arrows belong at the alveoli alone, never on the trachea, bronchi, or bronchioles.
  • The diaphragm domed during inhalation. It contracts and flattens to draw air in, and only domes upward as air leaves.
  • Alveoli drawn as dead-end sacs. They must be wrapped in a capillary network, with two arrows crossing the wall in opposite directions.
  • Closed cartilage rings on the trachea, or the epiglottis shown closed while breathing. The rings are C-shaped and open at the back, and the epiglottis closes only during swallowing.

Respiratory System Diagram Generator FAQ

The airway in order: nasal cavity, pharynx, larynx (with the epiglottis), trachea, the left and right main bronchi, the branching bronchioles, and the alveoli at the end of each bronchiole. Around them, label both lungs, the pleural membranes, the rib cage and intercostal muscles, and the diaphragm below. Most syllabuses also expect the C-shaped cartilage rings of the trachea to be named.

Need other anatomy figures?

Generate body system diagrams, organ close-ups, cell diagrams, and worksheet-ready biology illustrations with the same SciFigure AI workflow.