Microscope Diagram AI

Microscope Diagram Generator

Draw a labeled compound light microscope with the eyepiece, nosepiece, objective lenses, stage, condenser, illuminator, and both focus knobs named. Ask for a simple sketch or a blank one for students to label.

Every part labeledLabeled or blankCompound light microscope

AI Microscope Diagram Generator

Describe the level of detail and which parts to label.

Costs 5 credits514 / 2000 characters

Generate a publication-ready PNG from your description.

Preview

Microscope Diagram Example Previews

Target aspect ratio: 3:4

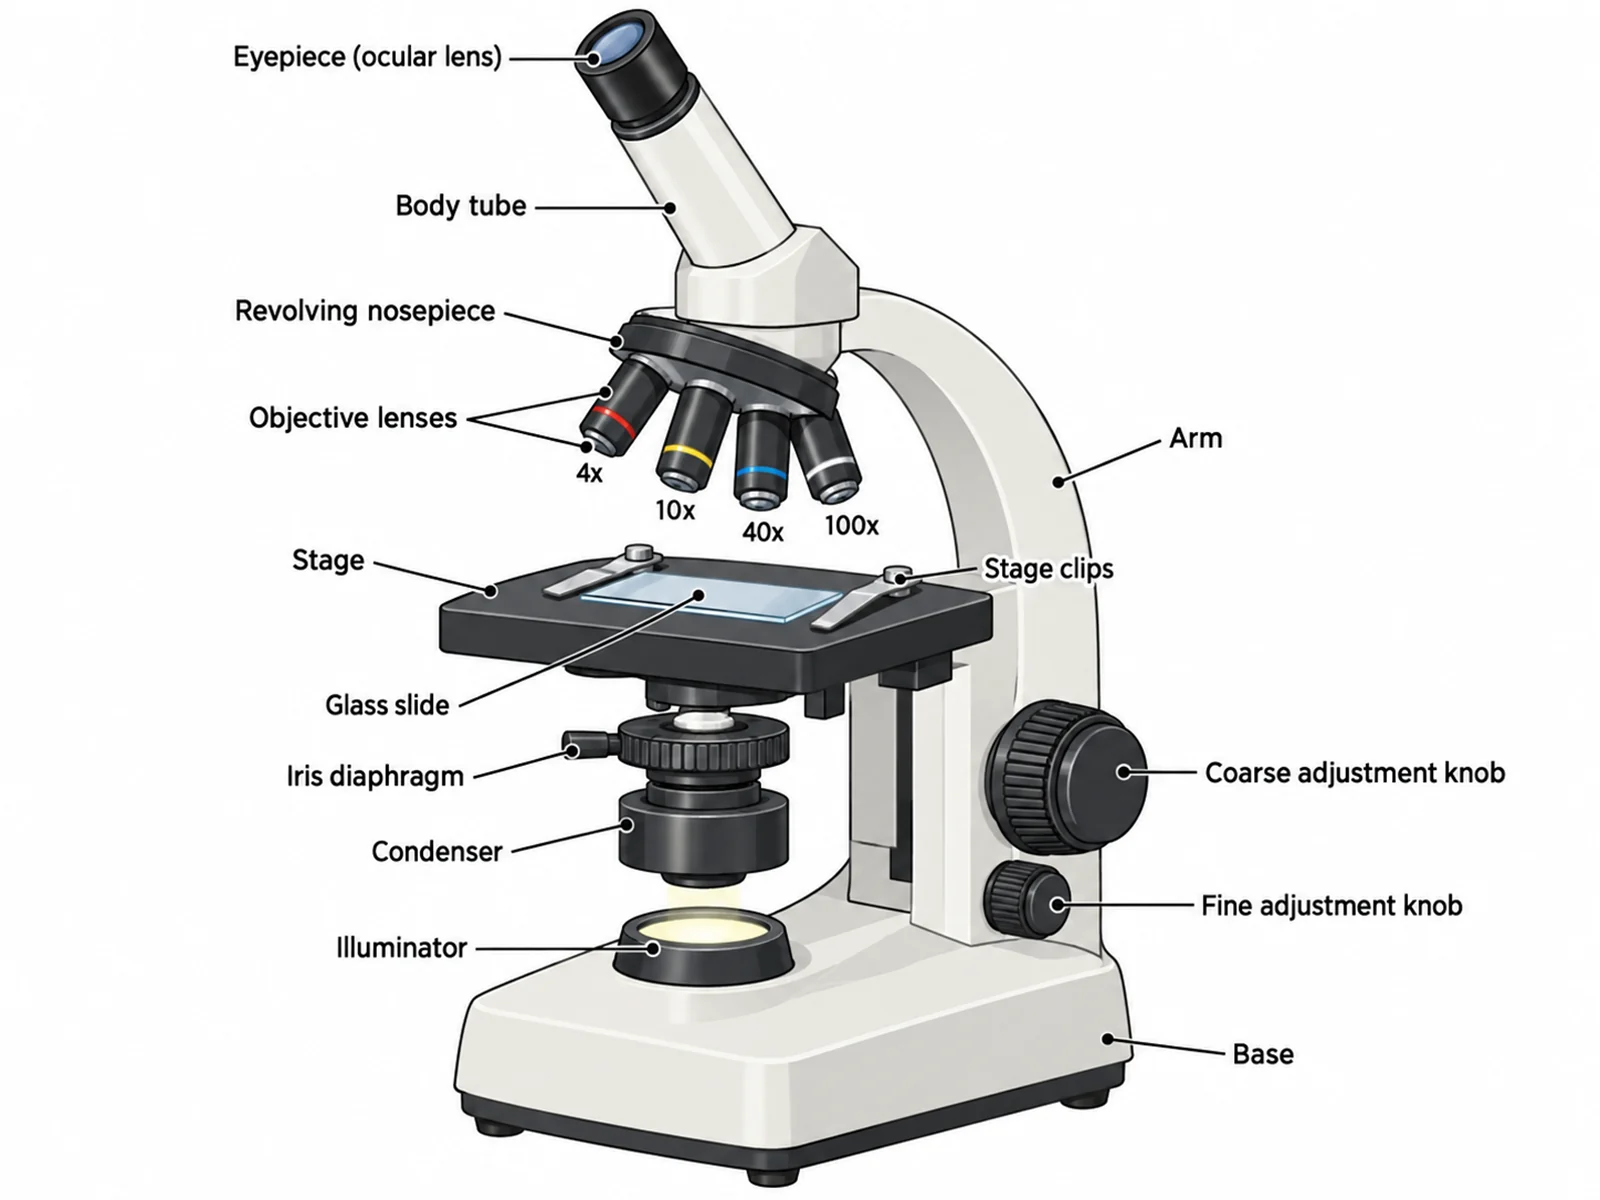
Labeled compound light microscope diagram naming the eyepiece, body tube, nosepiece, objective lenses, stage, condenser, illuminator, and both adjustment knobs
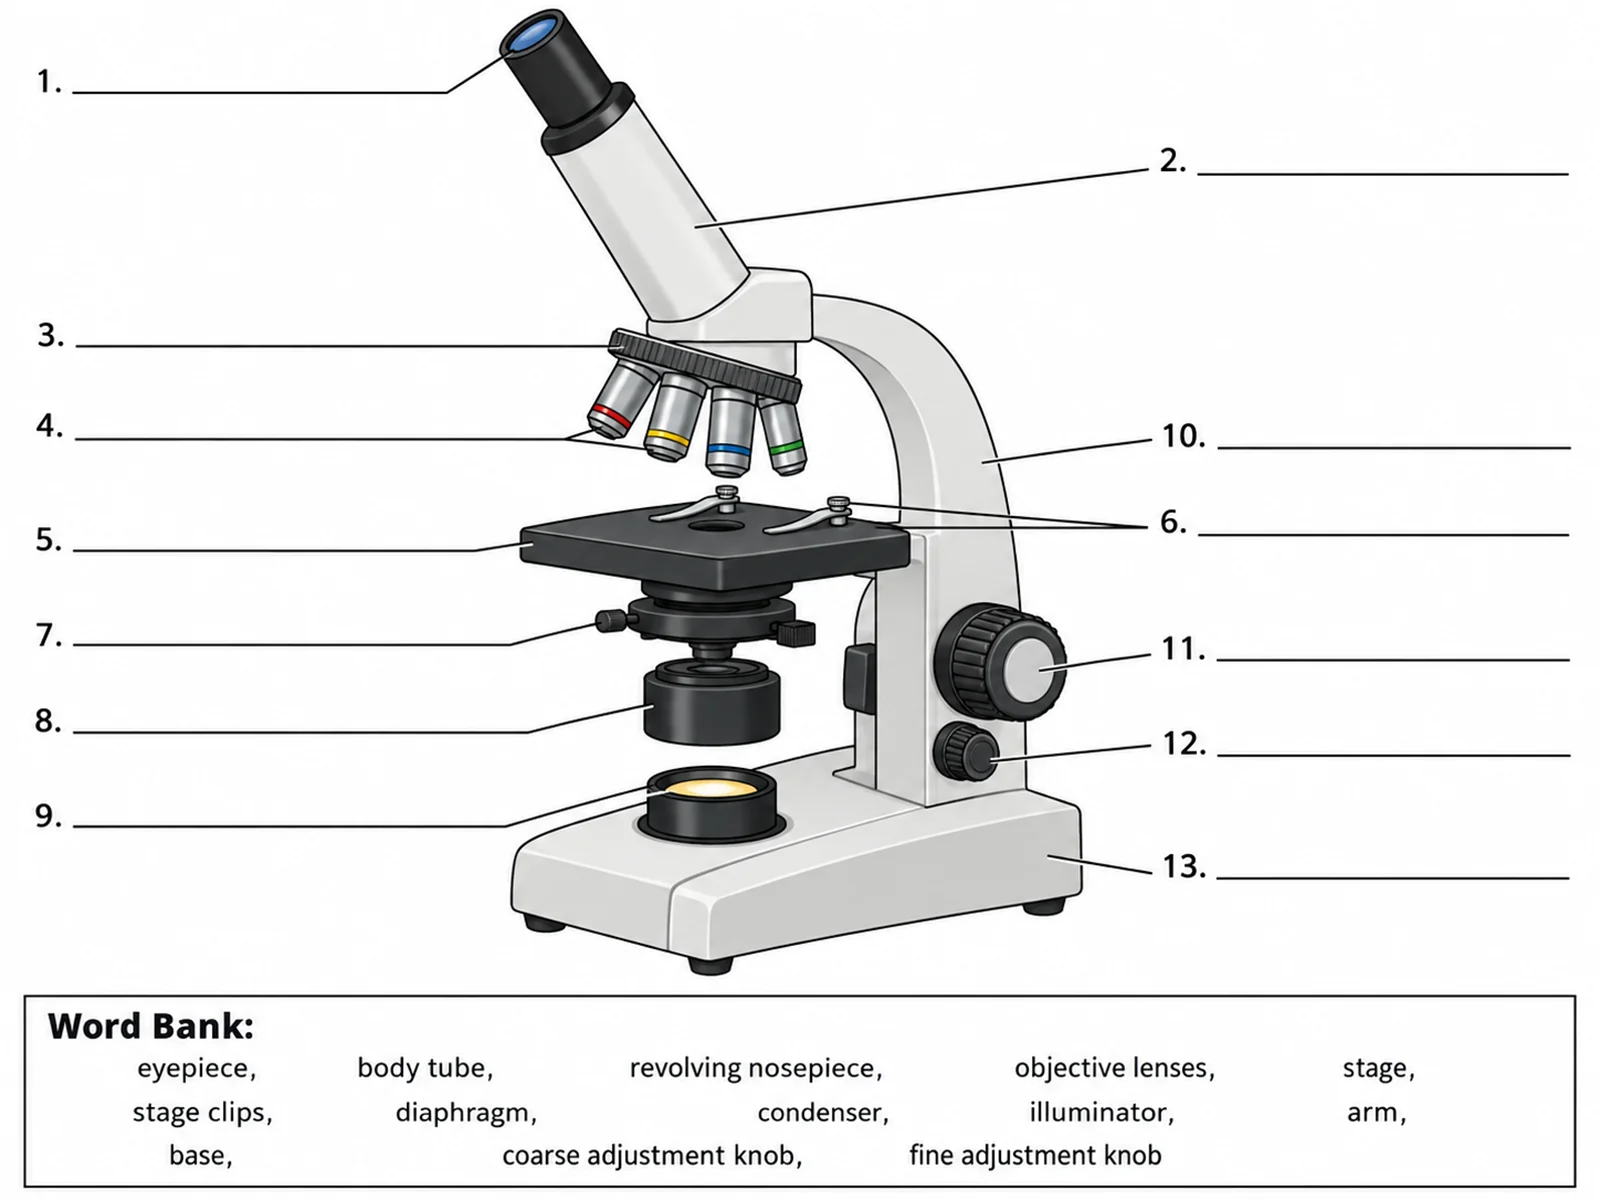
Blank unlabeled microscope diagram with numbered empty label lines and a word bank for students to complete
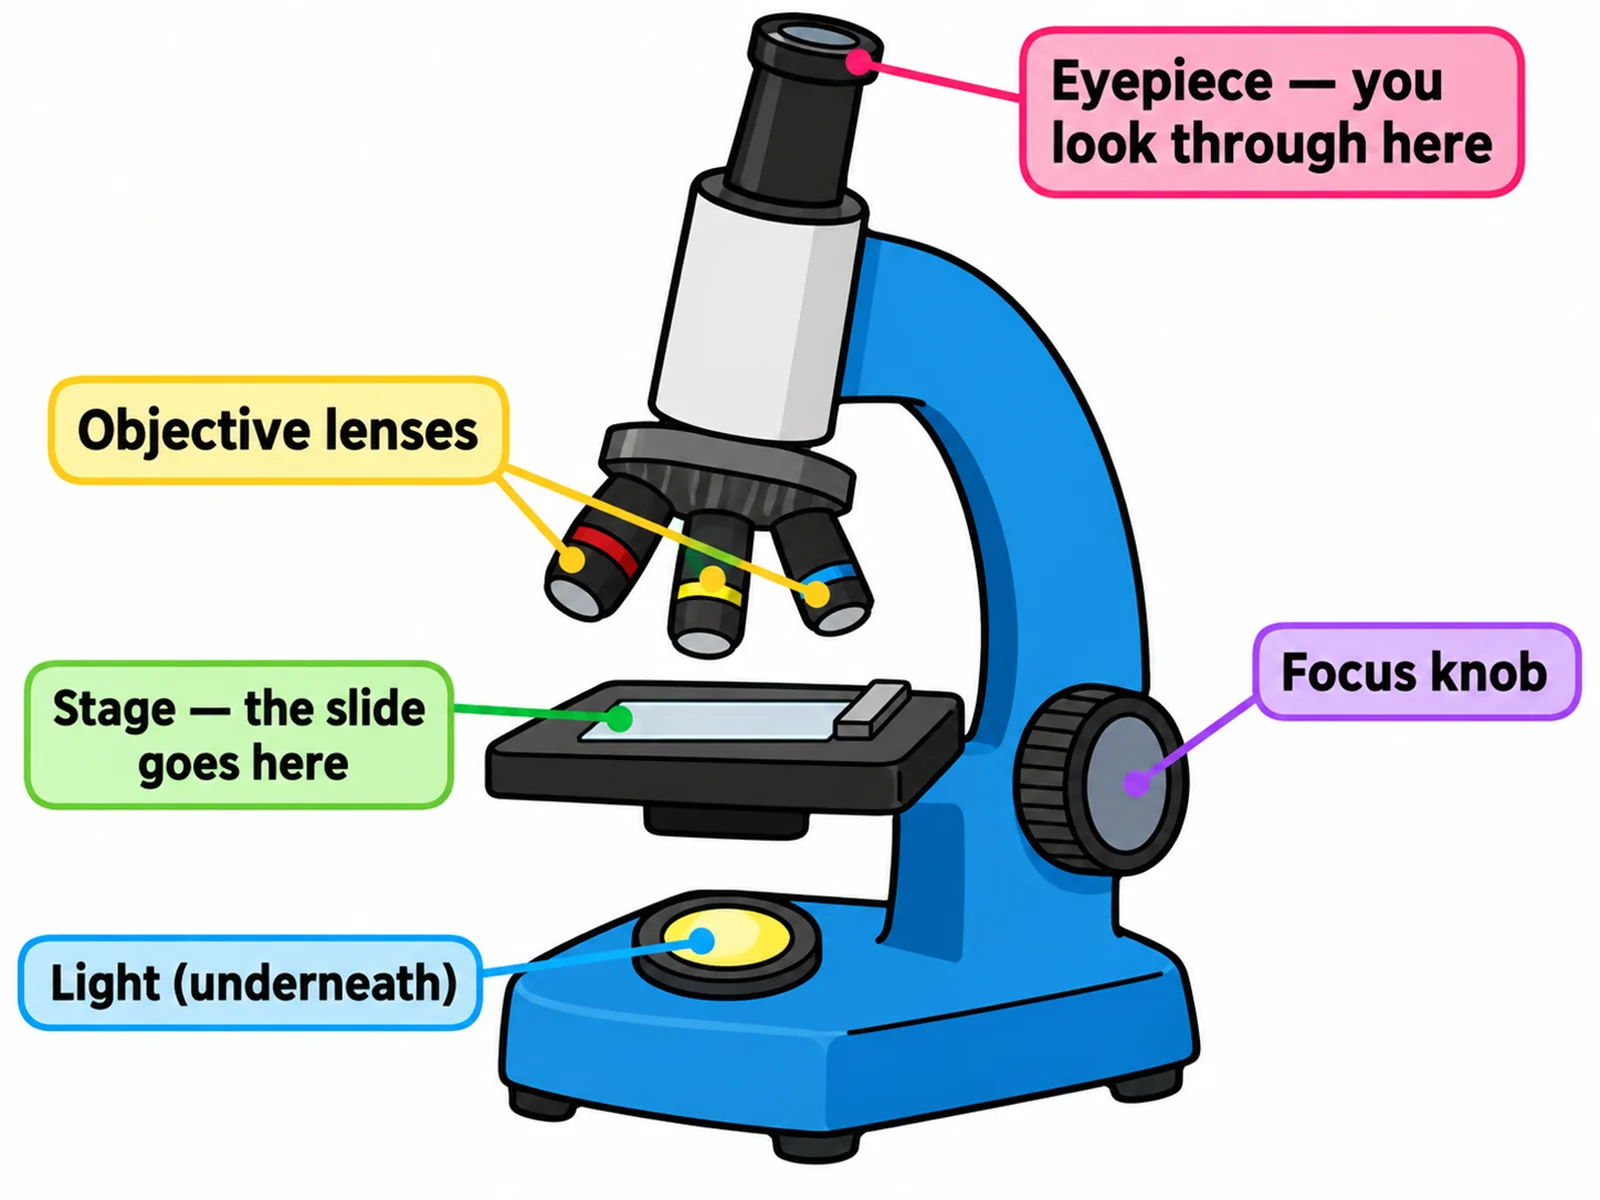
Simple easy-to-draw microscope with bold outlines and five basic labels for younger students

Sample previews. Describe your diagram to generate your own microscope figure.

Microscope Diagram Examples

Use these as visual directions for labeled instruments, blank worksheets, simple sketches, parts-and-functions charts, comparison figures, and optical ray diagrams.

Labeled compound light microscope diagram naming the eyepiece, body tube, nosepiece, objective lenses, stage, condenser, illuminator, and both adjustment knobs

Prompt

Create a fully labeled compound light microscope diagram on a white background, drawn upright in clean textbook line art. From the top down draw the eyepiece (ocular lens), the body tube, the revolving nosepiece holding four objective lenses of different lengths marked 4x, 10x, 40x, and 100x, the flat stage with two stage clips holding a glass slide, the iris diaphragm and the condenser directly beneath the stage, and the illuminator set into the base shining upward. Draw the curved arm on the right joining the head to the base, carrying a large coarse adjustment knob and a smaller fine adjustment knob. Label every part with thin dark leader lines and readable sans-serif text.
Labeled Compound Microscope

Blank unlabeled microscope diagram with numbered empty label lines and a word bank for students to complete

Prompt

Create a blank compound light microscope worksheet. Draw the same upright microscope — eyepiece, body tube, revolving nosepiece with four objectives, stage with stage clips, diaphragm and condenser below the stage, illuminator in the base, arm with two focus knobs — in clean line art with pale uniform fills and absolutely no text on the drawing. Run thin leader lines from each part out to a short horizontal ruled blank line, numbered 1 to 13. Add a word bank box below reading "eyepiece, body tube, revolving nosepiece, objective lenses, stage, stage clips, diaphragm, condenser, illuminator, arm, base, coarse adjustment knob, fine adjustment knob". Generous white space, no answer key.

Blank Microscope Worksheet

Simple easy-to-draw microscope with bold outlines and five basic labels for younger students

Prompt

Create a simple, easy-to-draw compound microscope diagram for younger students. Draw the whole instrument in bold flat colour with thick dark outlines and no shading: one eyepiece on top, a short body tube, a nosepiece with three objective lenses pointing down at a stage holding a slide, a round lamp in the base underneath the stage, and one big knob on the arm. Label only five things in large readable text: "Eyepiece — you look through here", "Objective lenses", "Stage — the slide goes here", "Light (underneath)", and "Focus knob". Plenty of white space, no condenser, no diaphragm.

Simple Microscope Drawing

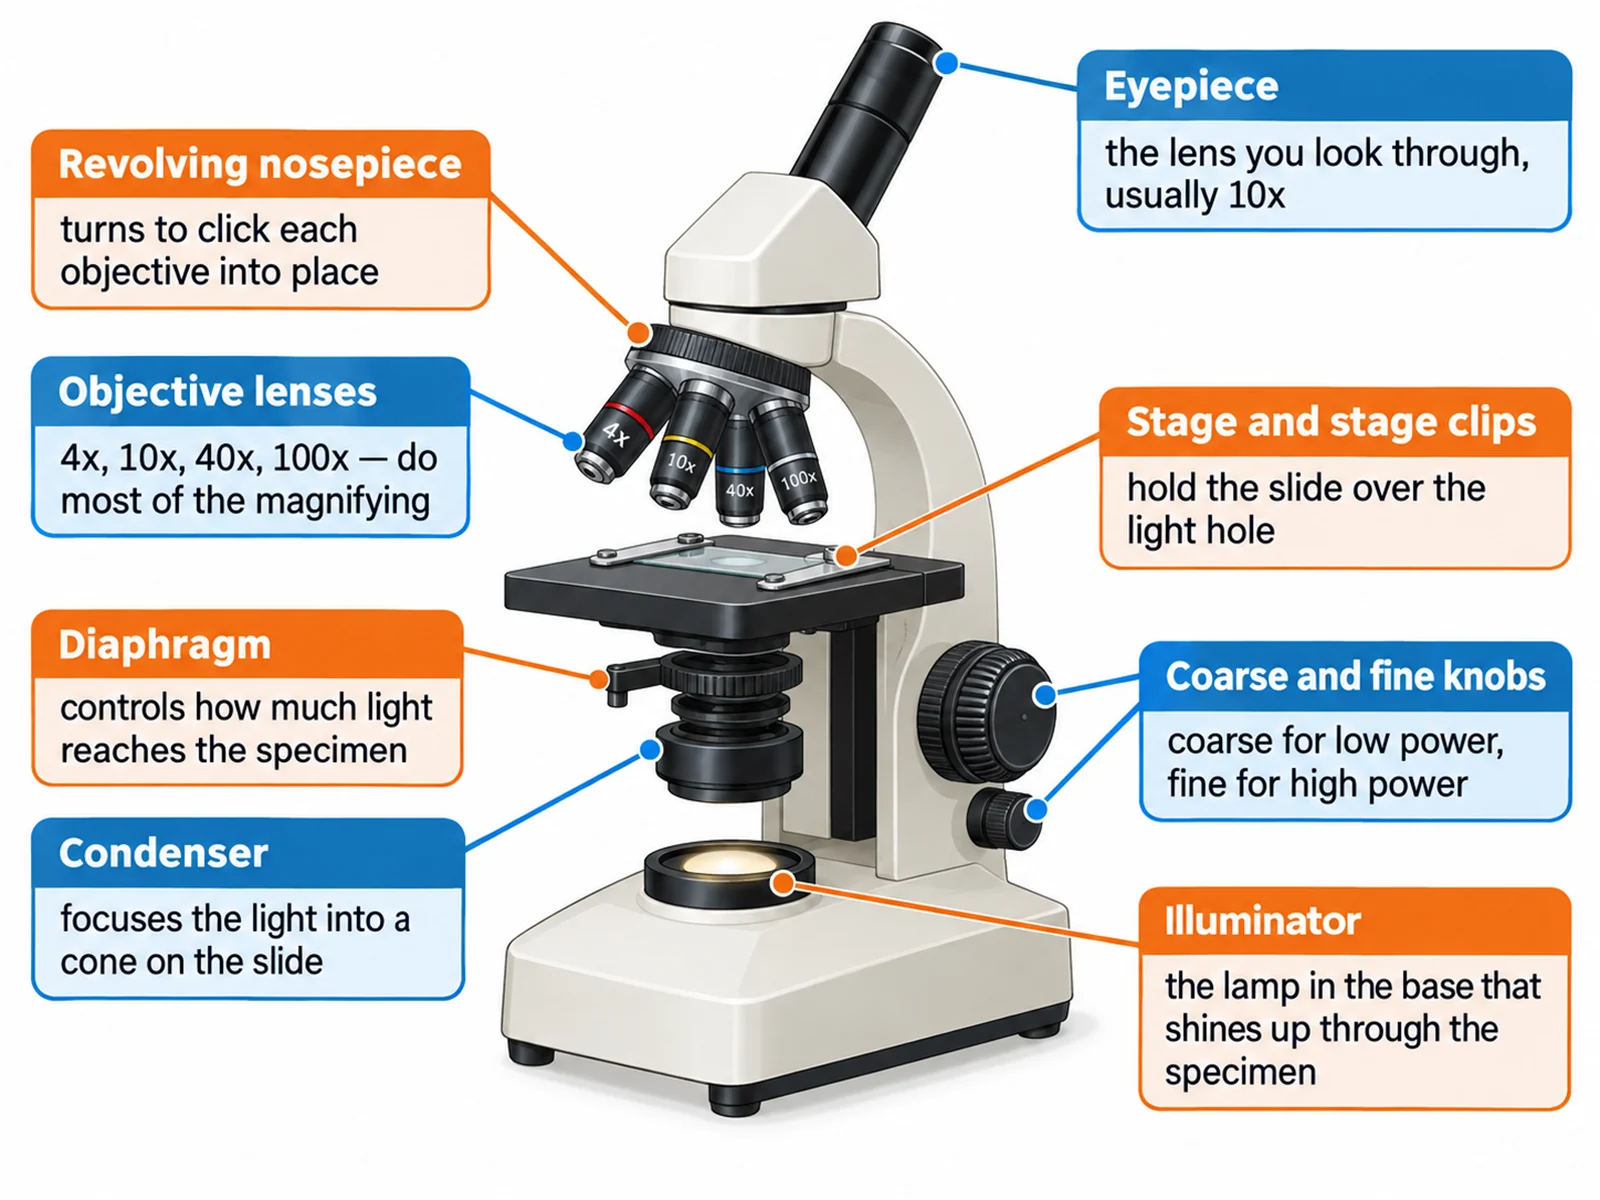
Microscope diagram with callout cards describing what the eyepiece, objectives, stage, diaphragm, condenser, illuminator, and focus knobs each do

Prompt

Create a microscope parts-and-functions diagram. Draw the labeled compound light microscope in the centre and surround it with rounded callout cards connected by thin leader lines, each with a bold part name and a one-line job: "Eyepiece" — "the lens you look through, usually 10x"; "Revolving nosepiece" — "turns to click each objective into place"; "Objective lenses" — "4x, 10x, 40x, 100x — do most of the magnifying"; "Stage and stage clips" — "hold the slide over the light hole"; "Diaphragm" — "controls how much light reaches the specimen"; "Condenser" — "focuses the light into a cone on the slide"; "Illuminator" — "the lamp in the base that shines up through the specimen"; "Coarse and fine knobs" — "coarse for low power, fine for high power".

Microscope Parts and Functions

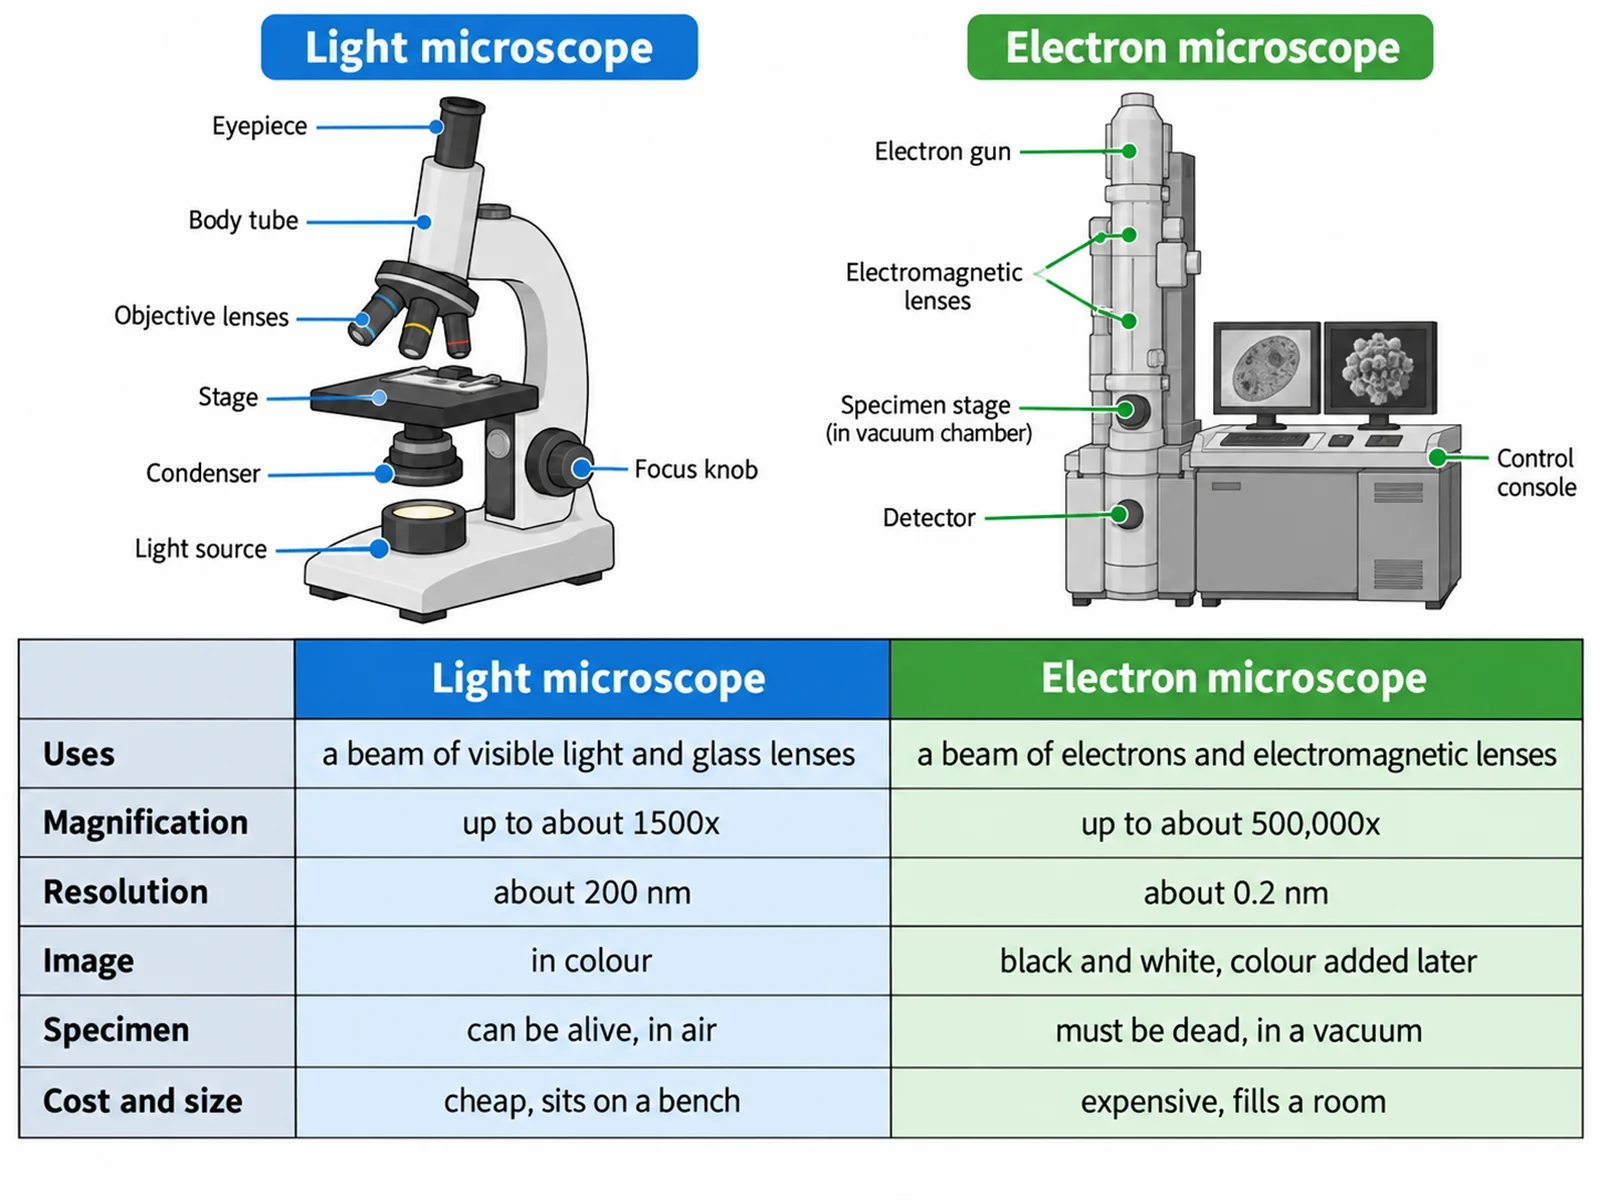
Side-by-side comparison of a compound light microscope and an electron microscope with magnification, resolution, and specimen differences

Prompt

Create a side-by-side comparison figure with a compound light microscope on the left and an electron microscope on the right, each drawn simply and labeled, with a comparison table beneath. Give the table rows "Uses" — "a beam of visible light and glass lenses" versus "a beam of electrons and electromagnetic lenses"; "Magnification" — "up to about 1500x" versus "up to about 500,000x"; "Resolution" — "about 200 nm" versus "about 0.2 nm"; "Image" — "in colour" versus "black and white, colour added later"; "Specimen" — "can be alive, in air" versus "must be dead, in a vacuum"; "Cost and size" — "cheap, sits on a bench" versus "expensive, fills a room". Clean flat colours, two accent colours only.

Light vs Electron Microscope

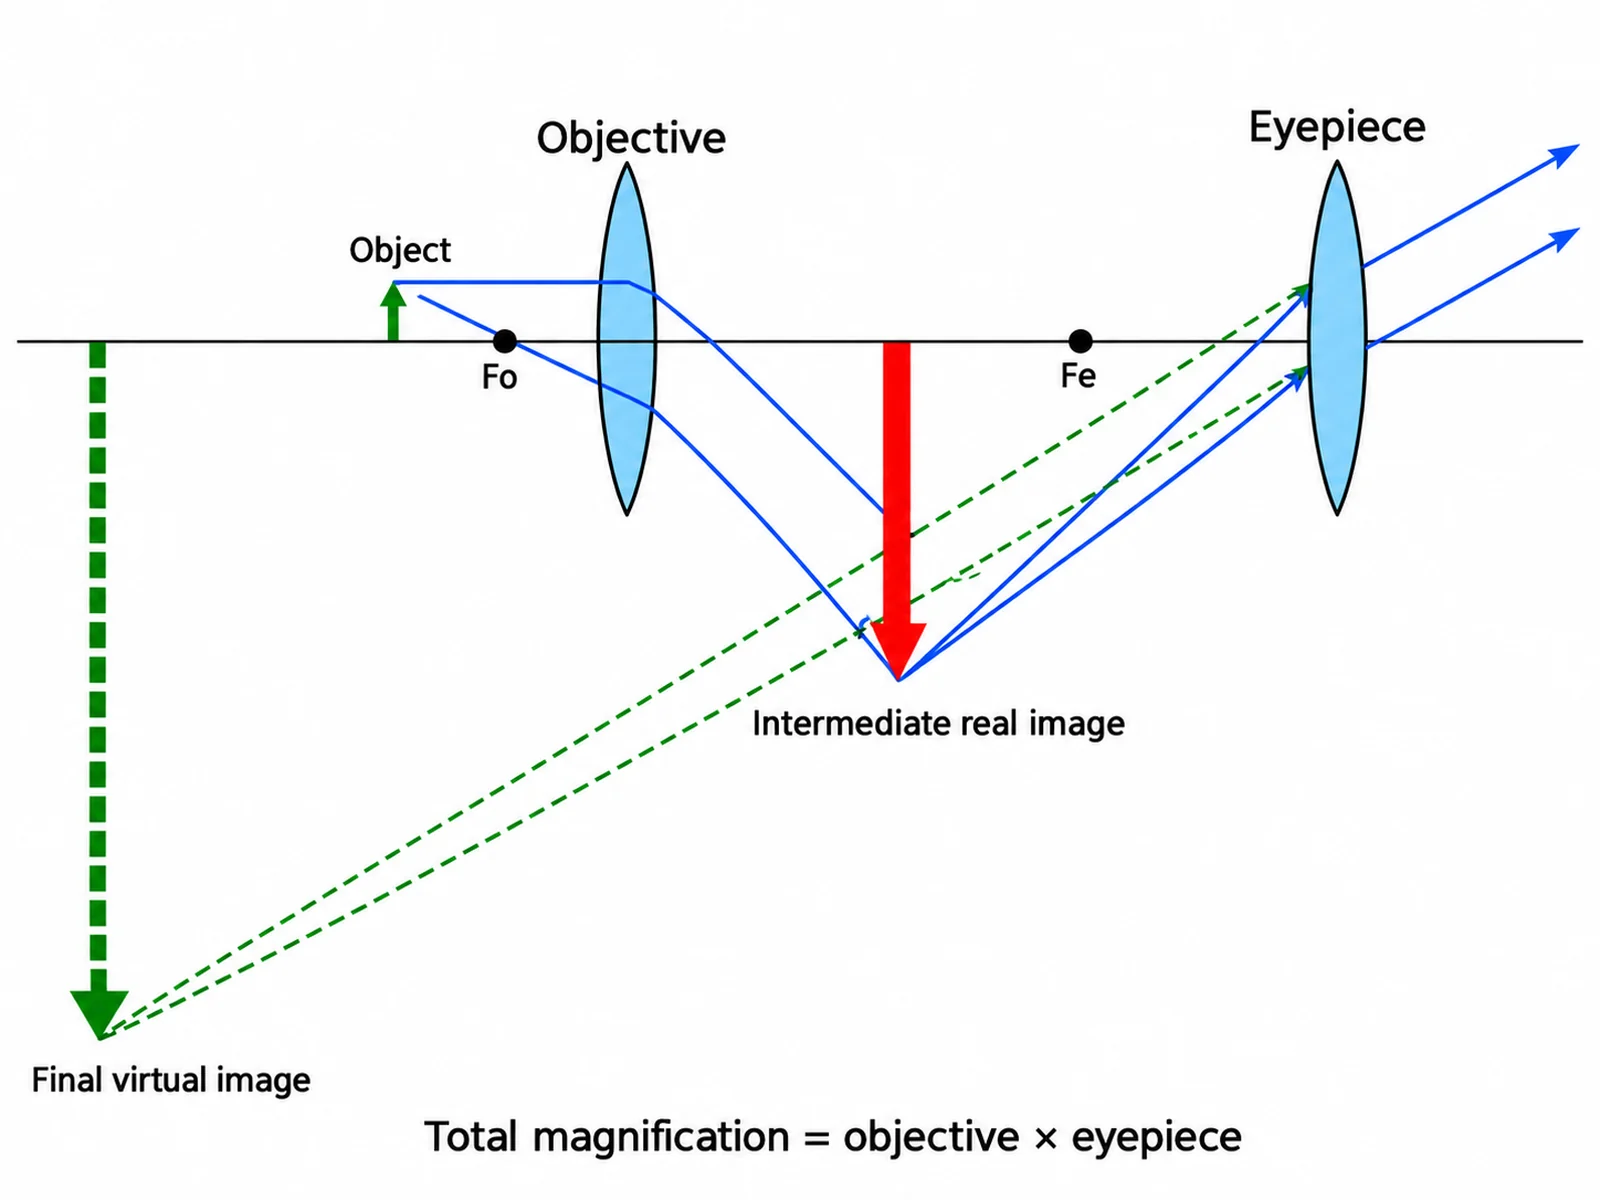
Optical ray diagram of a compound microscope showing the objective forming a real inverted image and the eyepiece forming a magnified virtual image

Prompt

Create a physics-style ray diagram for a compound microscope on a white background, drawn along a horizontal principal axis running left to right. Place the object as a small upright arrow just beyond the focal point of the objective lens, draw the objective as a converging lens with its focal points marked Fo, and trace rays to a real, inverted, magnified intermediate image inside the body tube. Place that intermediate image just inside the focal point Fe of the eyepiece lens, then trace the rays through the eyepiece to a large, magnified, virtual final image drawn with dashed lines on the far left. Label object, objective, intermediate real image, eyepiece, final virtual image, and add the caption "Total magnification = objective × eyepiece".

Microscope Ray Diagram

How to draw a labeled microscope diagram

1

Choose the detail level

A simple five-label sketch for younger classes, a full compound light microscope with all thirteen parts named, a parts-and-functions chart, or an optical ray diagram.

2

Generate the diagram

The generator keeps the optical order correct from eyepiece to illuminator, puts the light source below the stage, and draws the coarse and fine knobs as two separate parts.

3

Check the layout, then export

Confirm the illuminator is under the stage, the objectives hang from the nosepiece above the slide, and both focus knobs are labeled, then download the PNG.

What is a compound light microscope?

A compound light microscope magnifies in two stages: an objective lens close to the specimen forms an enlarged image, and the eyepiece magnifies that image again for your eye. That is what "compound" means — two lens systems working in series. Light from an illuminator in the base travels upward through a condenser, through a thin specimen mounted on a glass slide, and into whichever objective the nosepiece has clicked into place. Total magnification is the eyepiece magnification multiplied by the objective magnification, so a 10x eyepiece with a 40x objective gives 400x.

Parts of a compound microscope

  • Eyepiece (ocular lens): the lens you look through at the top of the body tube, usually 10x.
  • Body tube: carries the image from the objective lens up to the eyepiece.
  • Revolving nosepiece: the turret that holds the objectives and clicks each one into position.
  • Objective lenses: typically 4x scanning, 10x low power, 40x high power, and 100x oil immersion.
  • Stage and stage clips: the flat platform the slide rests on, with clips holding it over the light hole.
  • Diaphragm or iris: sits under the stage and controls how much light reaches the specimen.
  • Condenser: a separate lens under the stage that focuses the light into a cone on the slide.
  • Illuminator: the lamp or mirror in the base, below the stage, shining upward.
  • Coarse and fine adjustment knobs: on the arm; coarse focuses quickly on low power, fine sharpens on high power.
  • Arm and base: the arm joins the head to the base and is what you carry the microscope by.

How to use a compound microscope

  • Start low: click the 4x scanning objective into place and clip the slide over the stage opening.
  • Raise the stage close to the objective using the coarse knob while watching from the side, not through the eyepiece.
  • Look through the eyepiece and turn the coarse knob back until the specimen appears, then open or close the diaphragm for contrast.
  • Centre what you want before changing power — the field of view shrinks sharply as magnification rises.
  • Switch to 10x, then 40x, by turning the nosepiece; from 40x upward use the fine adjustment knob only.
  • Add a drop of immersion oil before using the 100x objective, and wipe the lens clean afterwards.

Microscope Diagram FAQ

Working from the top down: eyepiece (ocular lens), body tube, revolving nosepiece, objective lenses, stage with stage clips, diaphragm or iris, condenser, and the illuminator in the base. On the arm, label the coarse adjustment knob and the fine adjustment knob separately, and label the arm itself where it joins the head to the base.

Need other biology figures?

Generate lab equipment diagrams, cell figures, organelle close-ups, and worksheet-ready illustrations with the same SciFigure AI workflow.