Generate a labeled dermatome chart showing the C2 to S5 dermatomes on front and back body outlines, or a blank dermatome map for students to label, with a matching answer key. Zoom into the arm, the leg, or the trunk, or mark the ISNCSCI key sensory points. Every chart should be checked against the landmarks below.
Labeled or blankC2 to S5, front and backLandmarks to check
Landmarks from ISNCSCI key points
Worksheet + answer key pairs
Study aid, not for diagnosis
AI Dermatome Chart Generator
Describe the views and levels to show, or pick a blank map from the Labels menu.
592 / 2000 characters
Generate a PNG from your description, then check it against the landmarks below.
Preview
Dermatome Chart Example Previews
Target aspect ratio: 4:3
Sample previews. Describe your chart to generate your own dermatome map.
Labeled and Blank Dermatome Chart Examples
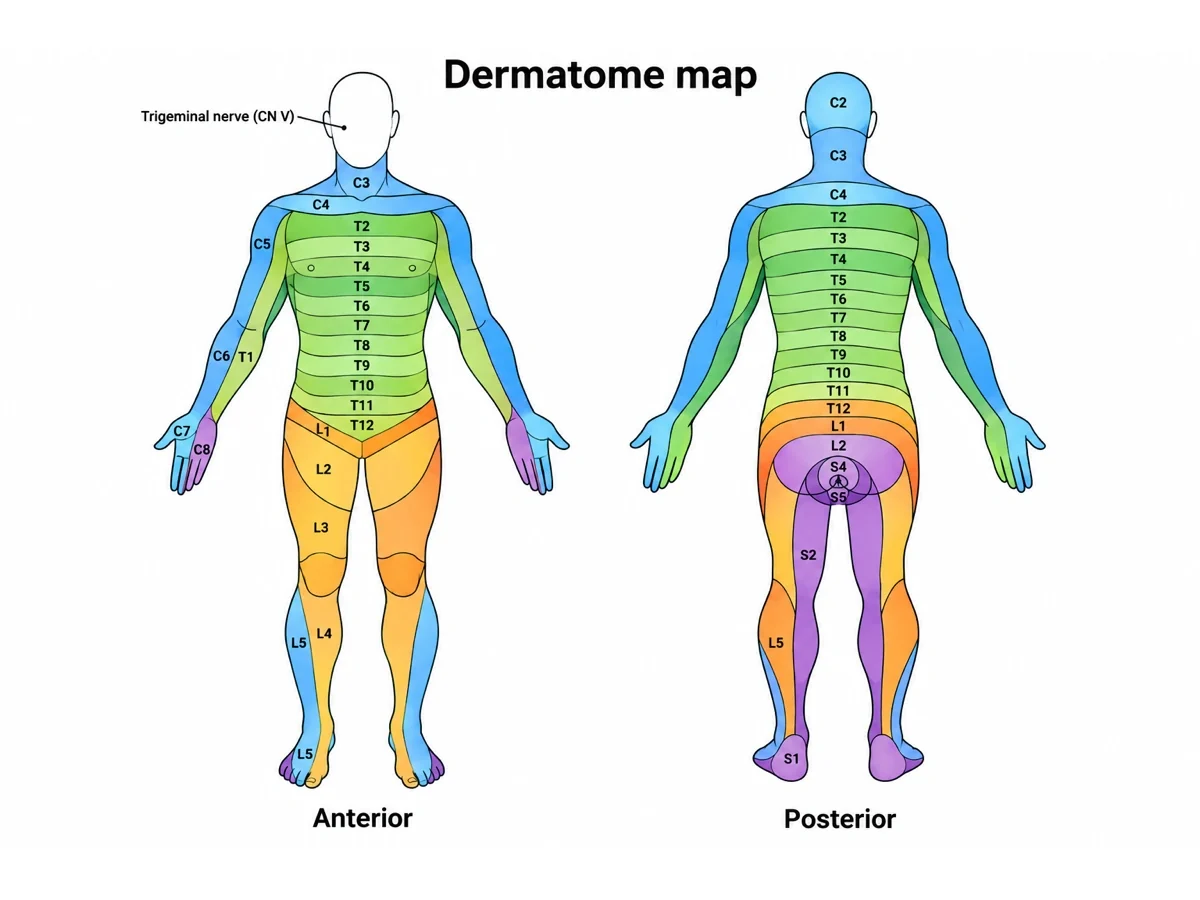
A labeled dermatome chart front and back, a blank dermatome map with its answer key, close-ups of the arm and the leg, and the ISNCSCI key sensory points.
Prompt
Create a labeled dermatome chart on a white background with a front view and a back view of the same adult body in anatomical position, palms facing forward, thumbs out. Divide the skin on both sides into dermatome bands with thin boundary lines and alternating pale tints, and write each level in its band. Leave the face grey, labeled "Trigeminal nerve (V1, V2, V3)", and draw no C1. Front: C3 neck, C4 top of shoulders and below the collarbones, T2 directly below C4, T4 at the nipples, T6 at the xiphoid, T10 at the umbilicus, T12 above the groin, L1 groin; arms lengthwise with C5 outer upper arm, C6 outer forearm and thumb, C7 middle finger, C8 little finger, T1 inner forearm, T2 inner upper arm; legs with L2 mid-thigh, L3 to the inner knee, L4 inner shin, L5 outer shin and top of foot, S1 outer foot. Back: C2 back of head, the thoracic and lumbar bands across the back, S1 heel, S2 down the back of the thigh, S3 inner buttock, S4–S5 around the anus.
Use this example
Prompt
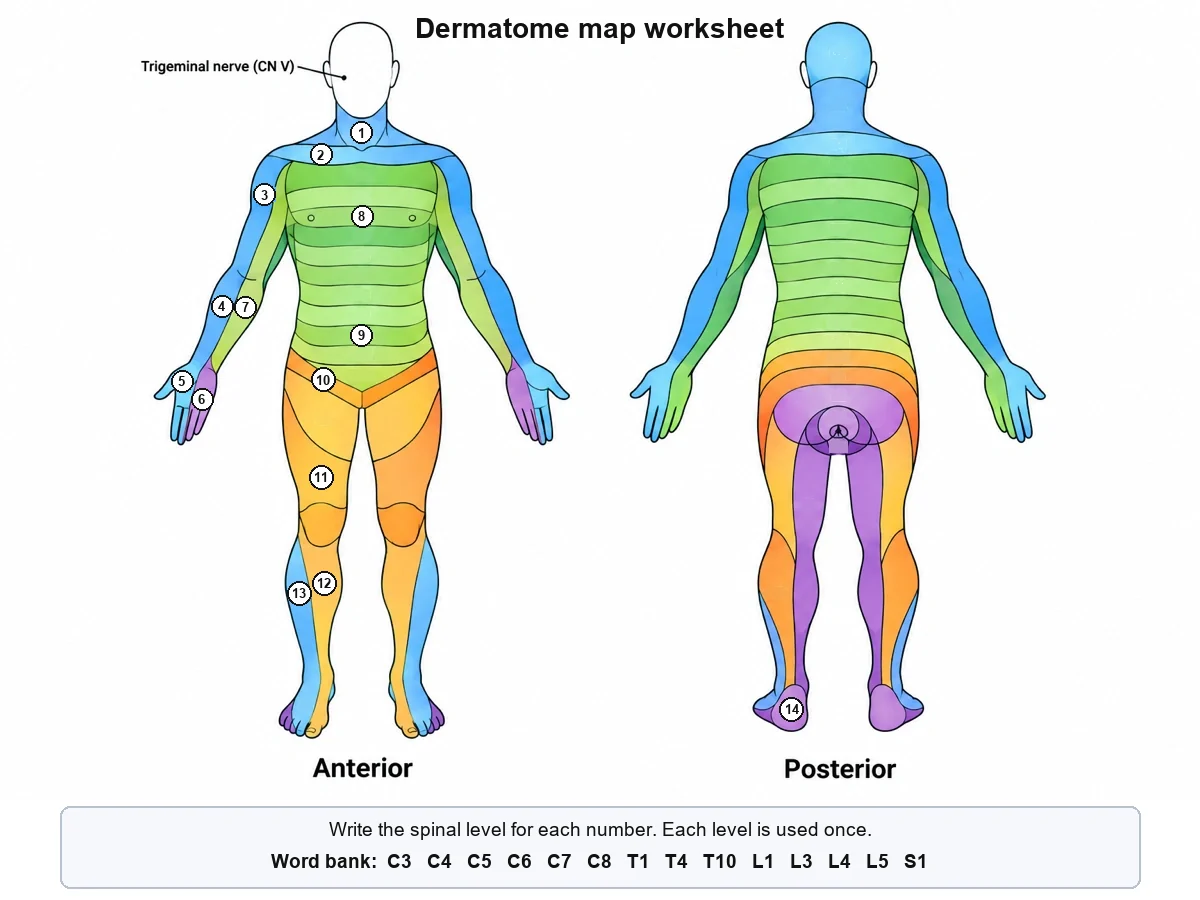
Create a blank dermatome map worksheet on a white background: front and back adult body outlines side by side in anatomical position, palms forward, divided into colour-coded dermatome bands from C2 to S5 with thin dark boundary lines, the face left plain and marked "Trigeminal nerve (CN V)". Write no spinal levels anywhere. Put a small white numbered circle inside fourteen bands, numbered from the neck down on the front view: 1 the neck, 2 the strip just below the collarbone, 3 the outer upper arm, 4 the outer forearm, 5 the middle of the hand, 6 the little-finger side of the hand, 7 the inner forearm, 8 the chest band at the nipple line, 9 the band at the umbilicus, 10 the groin, 11 the lower thigh, 12 the inner shin, 13 the outer shin, and 14 the heel on the back view. Below the figure add a word bank box listing exactly: C3, C4, C5, C6, C7, C8, T1, T4, T10, L1, L3, L4, L5, S1.
Blank worksheet
Use this example
Prompt
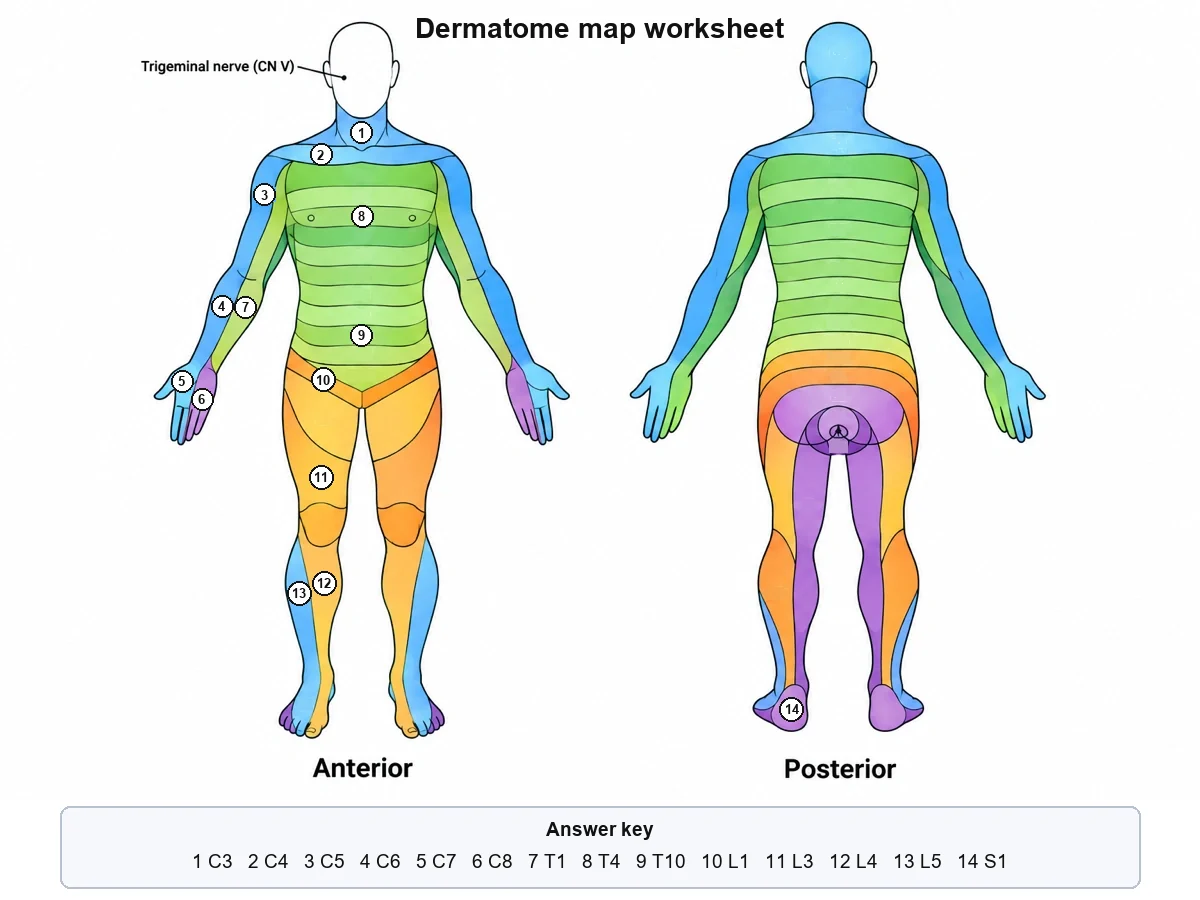
Create the answer key for a blank dermatome map worksheet on a white background: front and back adult body outlines side by side in anatomical position, divided into colour-coded dermatome bands from C2 to S5, with fourteen small numbered circles in the same bands as the worksheet (1 the neck, 2 below the collarbone, 3 the outer upper arm, 4 the outer forearm, 5 the middle of the hand, 6 the little-finger side of the hand, 7 the inner forearm, 8 the nipple line, 9 the umbilicus, 10 the groin, 11 the lower thigh, 12 the inner shin, 13 the outer shin, 14 the heel). Below the figure add an answer box reading exactly: 1 C3, 2 C4, 3 C5, 4 C6, 5 C7, 6 C8, 7 T1, 8 T4, 9 T10, 10 L1, 11 L3, 12 L4, 13 L5, 14 S1.
Use this example
Prompt
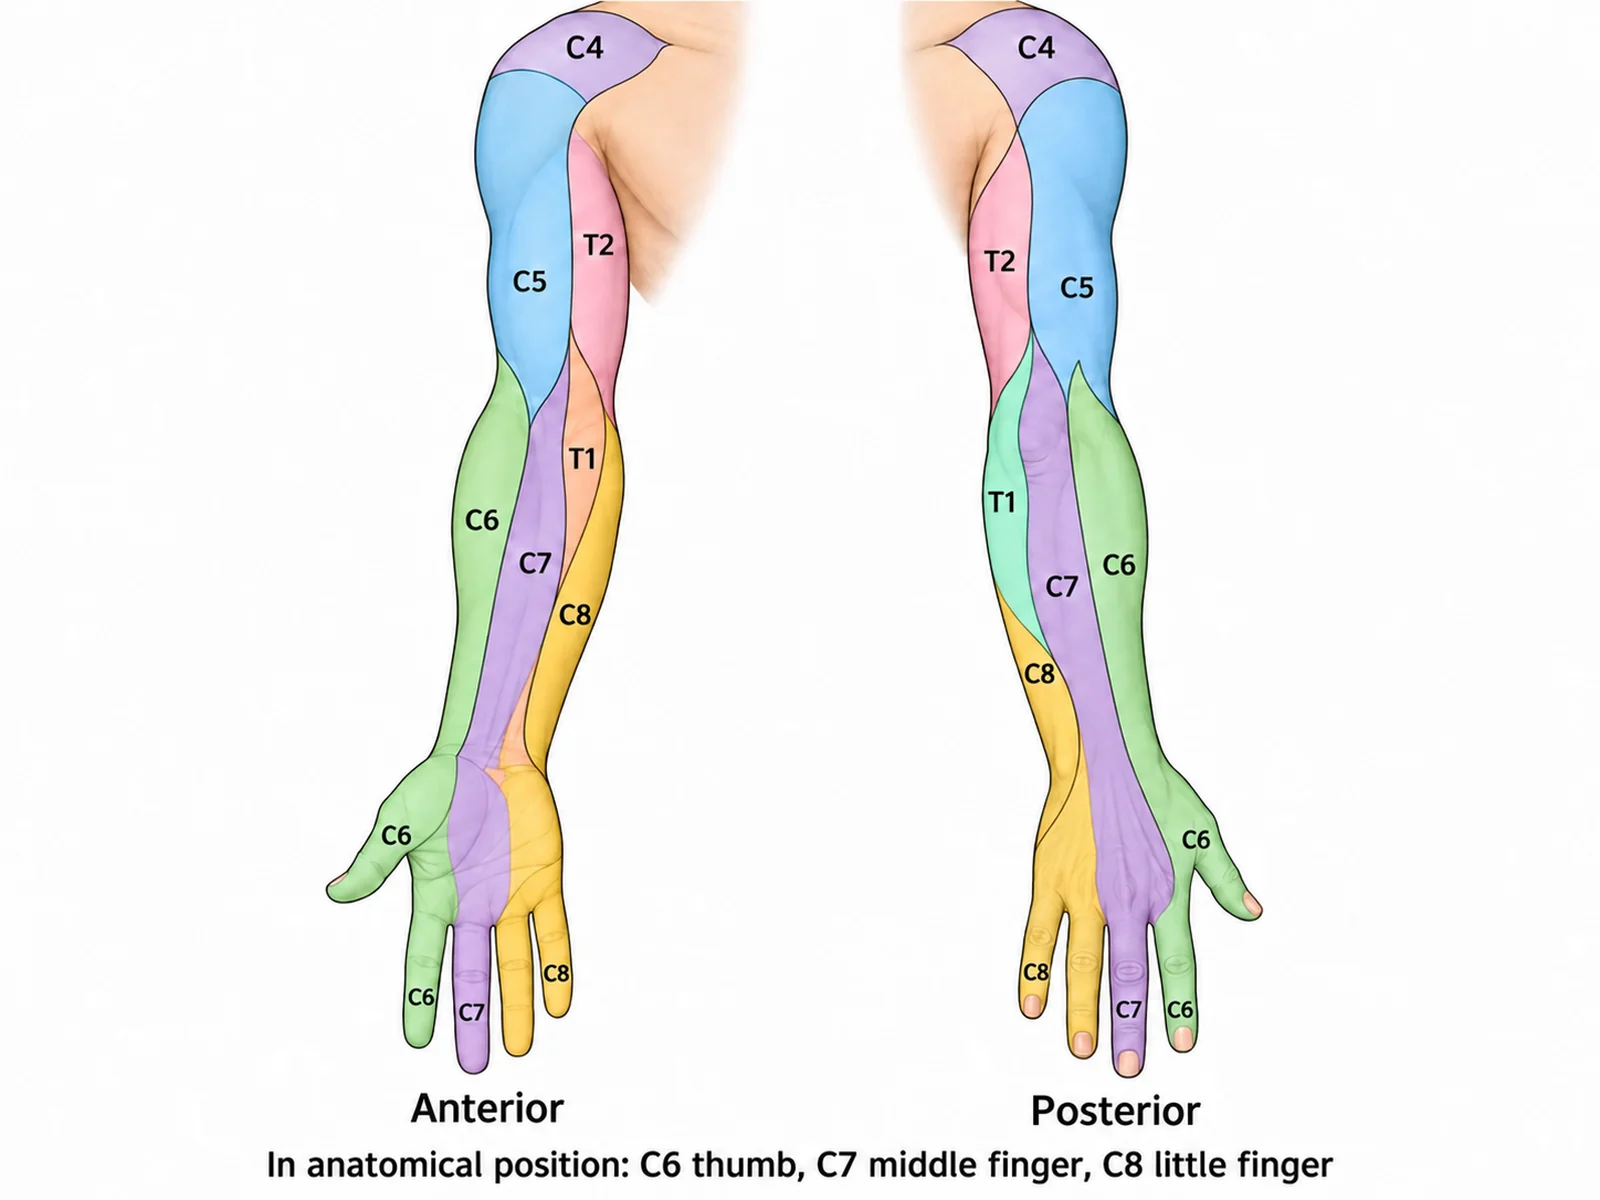
Create a labeled upper limb dermatome map on a white background, showing one arm with the shoulder in a front view (palm facing forward, thumb pointing away from the body) and a back view side by side. Draw the bands running lengthwise down the arm, never across it: C4 over the top of the shoulder; C5 down the outer upper arm to the elbow; C6 down the outer forearm into the thumb and index finger; C7 into the middle finger, running up the middle of the back of the forearm; C8 into the ring and little fingers and the inner edge of the hand; T1 up the inner forearm to the inner elbow; T2 over the inner upper arm into the armpit. Write each level in its band, and add the caption "In anatomical position: C6 thumb, C7 middle finger, C8 little finger".
Arm close-up
Use this example
Prompt
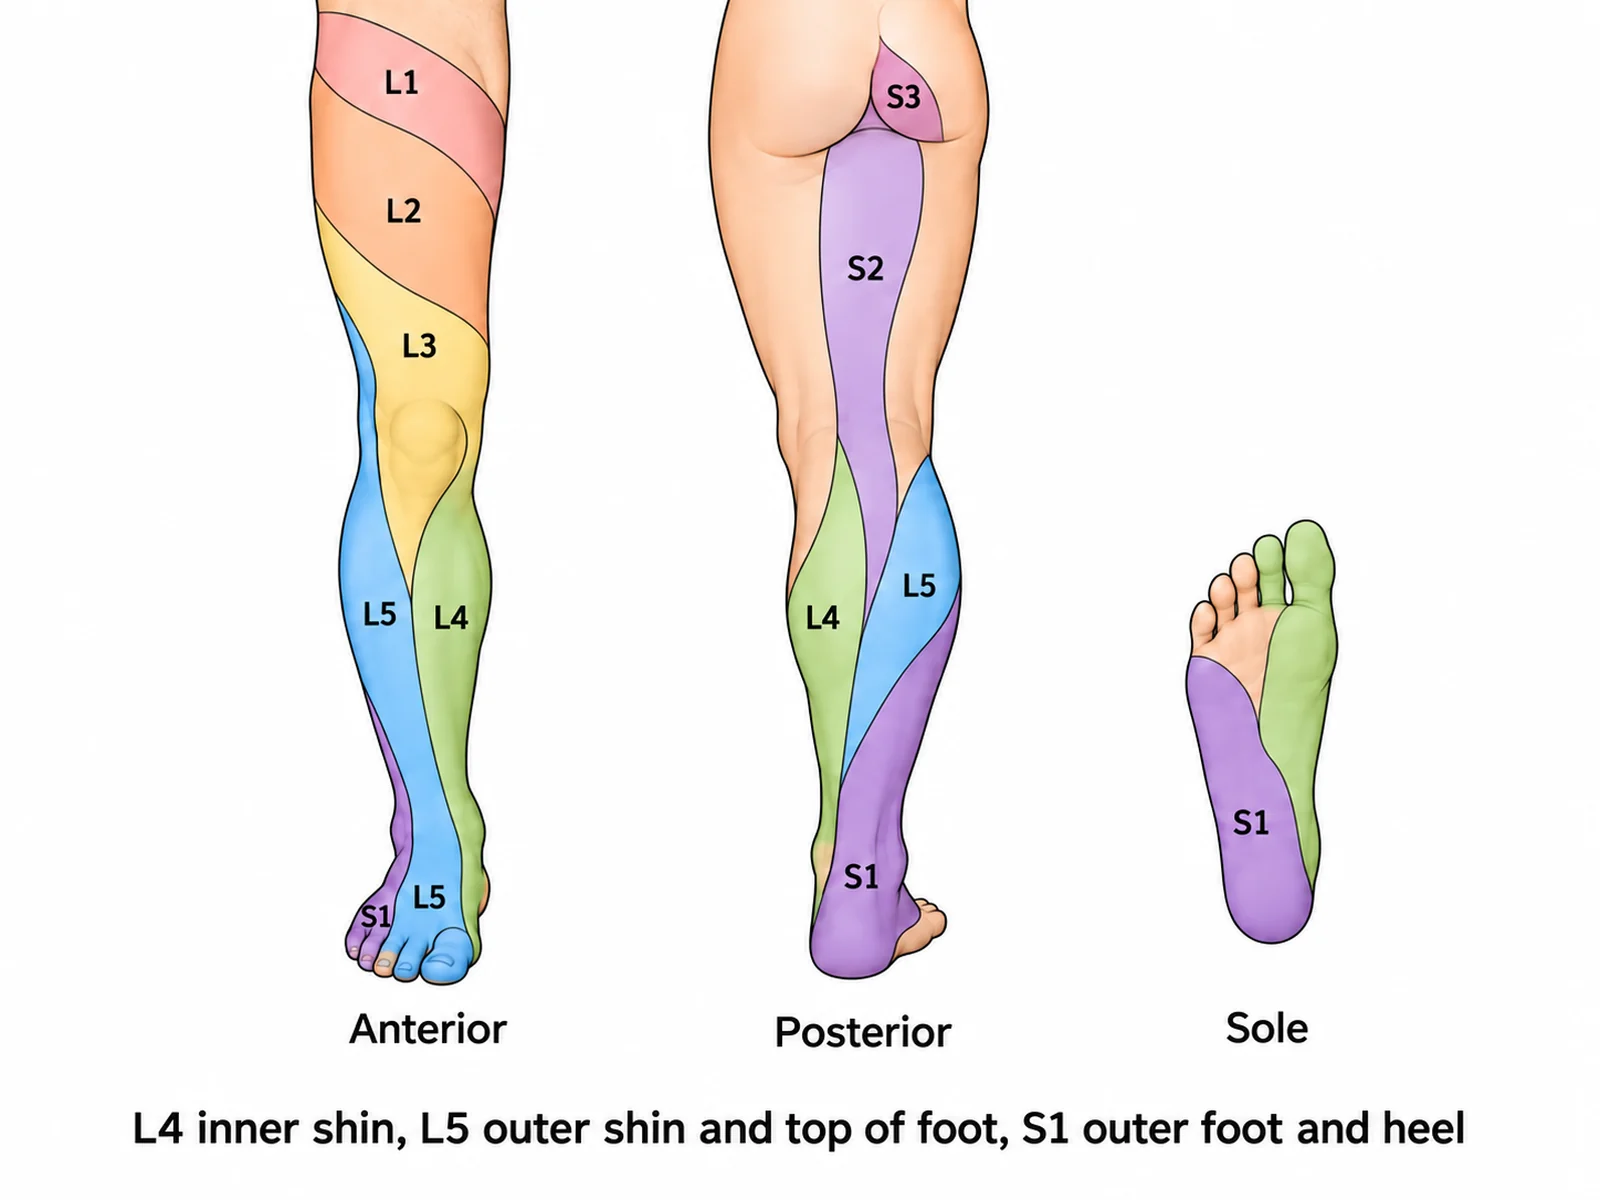
Create a labeled lower limb dermatome map on a white background, showing one leg from the groin to the toes in a front view and a back view side by side, plus a small view of the sole. Front view: L1 in the groin just below the inguinal ligament, L2 slanting across the middle of the thigh, L3 across the lower thigh to the inner knee, L4 down the inner side of the shin to the inner ankle, L5 down the outer side of the shin and over the top of the foot, S1 along the outer edge of the foot to the little toe. Back view: S2 as a strip down the back of the thigh into the calf, S1 on the outer back of the calf and the heel, L4 and L5 on the inner and outer calf. Sole: S1 over the heel and outer sole. Write each level in its band and add the caption "L4 inner shin, L5 outer shin and top of foot, S1 outer foot and heel".
Leg close-up
Use this example
Prompt
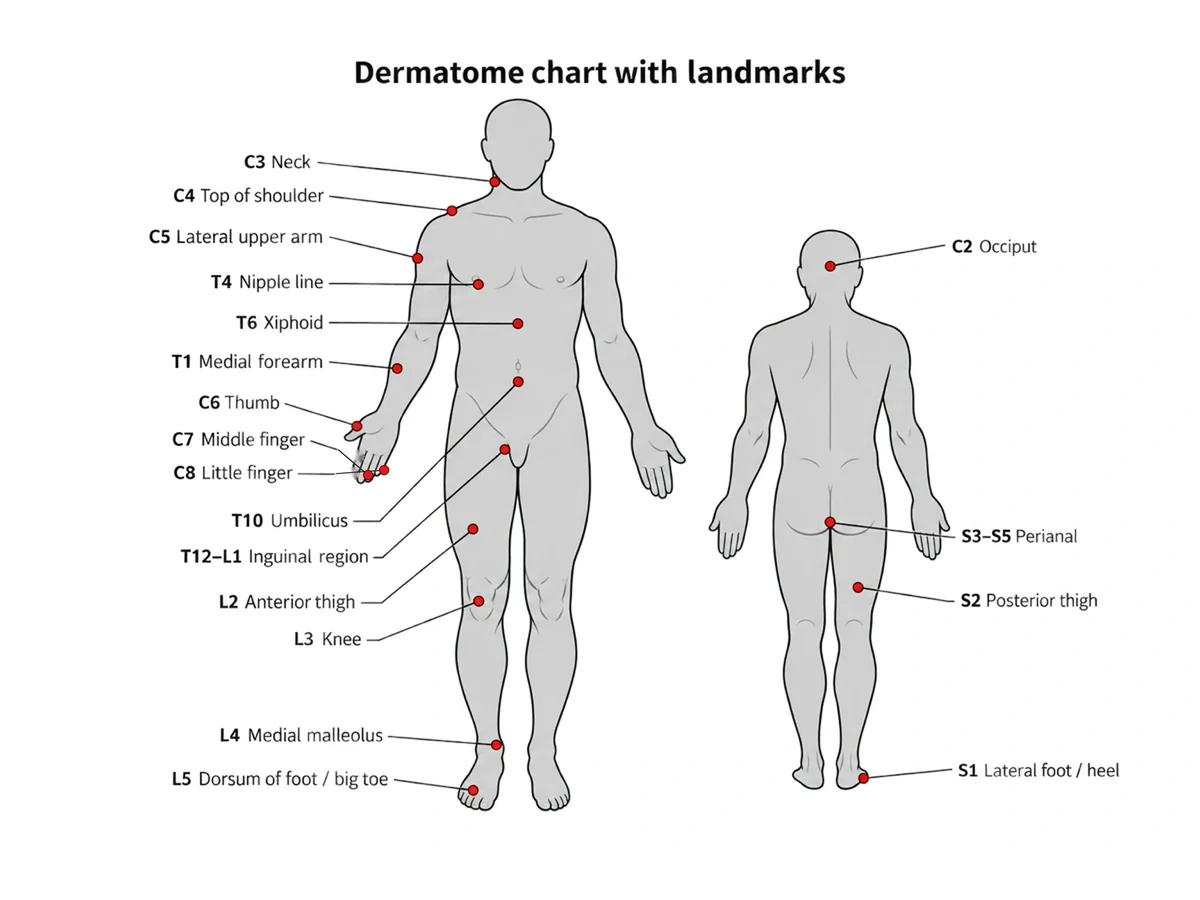
Create a dermatome chart with the ISNCSCI key sensory points on a white background: a front view and a back view of an adult body in anatomical position with the dermatome bands drawn in pale tints on both sides. On the person’s right side only, mark each key sensory point as a small dark dot with its level beside it: C2 just beside the bump at the back of the skull, C3 above the collarbone, C4 on top of the shoulder, C5 at the outer side of the elbow crease, C6 on the back of the thumb, C7 on the back of the middle finger, C8 on the back of the little finger, T1 at the inner side of the elbow crease, T2 at the top of the armpit, T4 at the nipple line, T6 at the xiphoid, T10 at the umbilicus, T12 at the middle of the inguinal ligament, L2 on the front of the mid-thigh, L3 on the inner knee above the joint, L4 at the inner ankle, L5 on the top of the foot at the third toe joint, S1 at the outer heel, S2 in the middle of the back of the knee, S3 at the buttock crease, and S4–S5 beside the anus.
Clinical (ISNCSCI points)
Use this example
How to make a labeled or blank dermatome chart
1
Pick the view, level, and labels
Front and back, a single view, or an arm, leg, or trunk close-up. Choose introductory landmarks, every band, or the clinical key points, then labeled, numbered, blank, or a word bank.
2
Generate the chart
The generator draws the body in anatomical position, starts at C2 with the face left to the trigeminal nerve, runs the arm and leg bands lengthwise, and keeps both sides symmetric.
3
Check every band, then export
Compare the chart with the landmarks on this page: C6 thumb, C7 middle finger, T4 nipples, T10 umbilicus, L4 inner shin, L5 outer shin, S1 outer foot. Regenerate if any band is off, then download.
Dermatome chart key facts
Spinal nerve pairs
31 (8 C, 12 T, 5 L, 5 S, 1 coccygeal)
Levels on the chart
C2 to S5
C1 dermatome
None
Face
Trigeminal nerve (V1, V2, V3)
Hand
C6 thumb, C7 middle finger, C8 little finger
Trunk landmarks
T4 nipple, T6 xiphoid, T10 umbilicus, L1 groin
Leg landmarks
L3 inner knee, L4 inner ankle, L5 top of foot, S1 outer heel
Saddle area
S3 to S5
ISNCSCI key points
28 per side (S4–S5 counted as one)
What is a dermatome chart?
A dermatome is the area of skin whose sensation is carried by a single spinal nerve root. A dermatome chart, or dermatome map, draws all of them on an outline of the body, usually a front view and a back view, as a series of labeled bands. They run from C2 at the back of the head, down the neck and trunk, out along the arms and legs, to S5 around the anus.
The chart is used in two worlds. In medicine and physical therapy it helps link a patch of numbness, tingling, or pain to the nerve root or spinal level that may be involved. In anatomy and physiology courses it is a classic labeling exercise. This page generates both a labeled dermatome chart and a blank dermatome map with numbered lines, and its answer key on the same drawing.
Dermatomes and spinal nerves: why the chart starts at C2
There are 31 pairs of spinal nerves: 8 cervical, 12 thoracic, 5 lumbar, 5 sacral, and 1 coccygeal. Each one carries sensory fibres from a strip of skin back to the spinal cord through its dorsal root, and that strip is its dermatome. The cervical nerves are numbered differently from the vertebrae: C1 to C7 emerge above the vertebra of the same number and C8 below C7. So there are eight cervical nerves but only seven cervical vertebrae.
The first cervical nerve usually has no sensory branch to the skin, so a dermatome chart starts at C2, on the back of the head. The face is not on the chart at all. It is supplied by the trigeminal nerve, a cranial nerve, through its three branches: V1 for the forehead, V2 for the cheek and upper lip, and V3 for the lower lip and jaw. The angle of the jaw is the exception, supplied by cervical nerves. At the other end, the coccygeal nerve supplies a small patch over the coccyx that most charts leave out.
The landmarks: a dermatome map from head to toe
Nobody memorises every boundary. Clinicians and students learn a set of landmarks and fill in the rest by order. These are the ones a chart must get right.
C2: the back of the head. C3: the neck. C4: the tops of the shoulders and a strip just below the collarbones, like a short cape.
C6: the thumb (and usually the index finger). C7: the middle finger. C8: the little finger.
T1: the inner forearm. T2: the inner upper arm and the armpit.
T4: the nipple line. T6: the xiphoid process at the bottom of the breastbone. T10: the umbilicus. T12 and L1: the groin.
L3: the lower front of the thigh to the inner knee. L4: the inner shin down to the inner ankle. L5: the outer shin and the top of the foot. S1: the outer edge of the foot, the little toe, and the heel.
S2: a strip down the back of the thigh. S3: the inner buttock. S4 and S5: rings around the anus, the innermost "saddle" area.
Upper limb dermatomes: C5 to T2
The arm is where most generated dermatome charts fail, because the bands do not run across it. As the limb bud grows out of the body wall during development, it takes the C5 to T1 segments with it and stretches them into strips along its length. Drawn on a body in anatomical position, palms forward and thumbs out, the order runs around the limb. C5 runs down the outer upper arm to the elbow, C6 down the outer forearm into the thumb, and C7 into the middle finger and up the middle of the back of the forearm. C8 covers the ring and little fingers and the inner edge of the hand and lower forearm. T1 runs up the inner forearm to the inner elbow, and T2 over the inner upper arm into the armpit.
A useful self-check: walk your finger around the hand from the thumb to the little finger and the numbers rise, C6, C7, C8. Then come back up the inner arm, T1 and T2. If a chart reads C5, C6, C7, C8 in bands stacked across the upper arm, or puts C8 on the thumb, it is wrong.
Trunk dermatomes: T2 to L1 and the C4–T2 junction
On the trunk the dermatomes are the simple part: nearly horizontal bands, one per thoracic level, wrapping from the spine around to the front and sloping slightly downward as they go. Three landmarks anchor them: T4 at the nipple line, T6 at the xiphoid process, and T10 at the umbilicus. T12 sits just above the inguinal ligament, and L1 covers the groin and the top of the thigh just below it.
One feature surprises students. On the front of the upper chest, C4 sits directly above T2. The C5 to T1 bands that would otherwise lie between them were carried out into the arm, so the chest skips from C4 to T2. A chart that runs C5, C6, C7, and C8 down the chest is the most common error this produces. Because neighbouring dermatomes overlap heavily on the trunk, losing a single thoracic root may cause little or no measurable numbness, which is one reason trunk boundaries are drawn as approximations.
Lower limb and saddle dermatomes: L1 to S5
The leg follows the same lengthwise logic as the arm, with a twist. During development the lower limb rotates inward, so its bands spiral from the outer hip down and around to the inner leg.
L1: the groin and the top of the front of the thigh, just below the inguinal ligament.
L2: slanting across the middle of the front of the thigh.
L3: across the lower thigh to the inner side of the knee.
L4: from the knee down the inner side of the shin to the inner ankle, the medial malleolus.
L5: down the outer side of the shin and over the top of the foot to the toes, including the space between the big toe and the second toe.
S1: along the outer edge of the foot to the little toe, around the heel and over most of the sole, and up the outer back of the calf.
S2: a strip down the middle of the back of the thigh into the calf.
S3 to S5: the saddle area. S3 is over the inner buttock and the buttock crease, and S4 and S5 form rings around the anus.
Why a dermatome chart needs a front and a back view
Several levels can only be seen from one side, so a single view always leaves gaps. The back view is where C2 covers the back of the head and the thoracic bands cross the back at roughly the height of their own vertebrae, sloping down as they wrap forward. The lumbar levels L1 to L3 lie over the lower back and the top of the buttock, S2 runs as a strip down the back of the thigh, S1 covers the heel and the outer back of the calf, and S3 to S5 form the saddle rings around the anus. The front view is where the hand pattern, the nipple and umbilicus landmarks, and the L2 to L5 spiral down the front of the leg are clearest. The default view on this page draws both side by side for that reason.
Key sensory points: how dermatomes are tested
Because boundaries vary, the clinical examination does not test whole bands. It tests one standard spot per dermatome, chosen because it is reliably within that level in most people. The International Standards for Neurological Classification of Spinal Cord Injury (ISNCSCI) define 28 of these key sensory points on each side, from C2 to S4–S5, each tested with light touch and pinprick. Examples include the outer side of the elbow crease for C5 and the back of the thumb, middle finger, and little finger for C6, C7, and C8. T1 is the inner side of the elbow crease, T4 the nipple line, T10 the umbilicus, and T12 the middle of the inguinal ligament. In the leg, L3 is the inner knee above the joint, L4 the inner ankle, L5 the top of the foot at the third toe joint, and S1 the outer heel. S2 is the middle of the back of the knee, S3 the buttock crease, and S4–S5 just beside the anus. Choose the clinical level to mark them on the chart.
Why dermatome maps disagree
Put two dermatome charts side by side and the limb boundaries rarely match. The two classic maps were made by different methods. Otfrid Foerster mapped dermatomes in 1933 by studying the area of preserved sensation after cutting the roots above and below. Keegan and Garrett in 1948 mapped areas of reduced sensation in patients with single disc herniations. Their leg maps in particular differ, and many modern charts mix the two.
In 2008 Lee, McPhee, and Stringer reviewed the evidence systematically. They concluded that the widely used maps rest on limited and sometimes flawed data, and they published a map of the most consistent area for each root. Two points matter for anyone using a chart. Dermatomes overlap, especially on the trunk, so their edges are gradual rather than sharp. And they vary from person to person. A chart is a guide to the usual pattern, not a precise boundary map of any one patient.
Dermatomes in practice: shingles, nerve roots, and spinal injury
Shingles (herpes zoster): the chickenpox virus reactivates in one sensory ganglion and travels along that nerve, so the rash follows a single dermatome. It is typically a band on one side of the trunk that stops at the midline.
Nerve root compression: a herniated disc pressing on a root can cause pain or numbness in its dermatome. An L5 root problem classically runs down the outer leg to the top of the foot, an S1 problem down the back of the leg to the outer foot and sole, and a C6 problem into the thumb. Real patterns vary, and overlap blurs them.
Spinal cord injury: the ISNCSCI examination tests every key sensory point on both sides to find the lowest level with normal sensation, which helps define the neurological level of injury.
All of these need a clinical examination. A chart, including a generated one, is a study and reference aid, not a diagnostic tool.
Memory aids for the dermatome landmarks
C6 is the thumb: make a "6" by touching thumb and index finger.
C6, C7, C8 cross the hand in order: thumb, middle finger, little finger.
T4 is at the nipples and T10 at the belly button: "T-10, belly butTEN".
L1 is the groin, at the inguinal ligament.
L4 runs down the inner shin to the inner ankle; L5 runs down the outer shin to the top of the foot and the big-toe web space.
S1 is the outer foot and the little toe; S2 runs down the back of the leg.
Using a blank dermatome chart in class
Start with the landmarks: the introductory level labels only C6, C7, C8, T4, T10, L1, L4, L5, and S1, which is a good first worksheet.
Then the full map: the blank worksheet on this page numbers fourteen bands from C3 to S1 across the front and back views; make the answer key from the same result so the numbers match.
Arm and leg close-ups: test the limb strips on their own, where most errors happen.
Pair it with a case: give students a pattern of numbness (thumb and outer forearm, for instance) and ask which level it fits.
Remind students that boundaries vary: a good answer names the level, not an exact edge.
What an image model gets wrong on dermatome charts
This page is honest about its limits. A dermatome chart asks an image model to place about thirty labeled, overlapping, symmetric bands with exact landmarks, and that is at the edge of what current models do reliably. The errors seen most often are a C1 band or cervical numbers on the face, C5 to C8 running down the chest instead of the arm, stripes across the limbs, C6 and C8 swapped on the hand, T10 drawn at the nipples, L4 and L5 swapped on the shin, a level skipped or repeated, and the two sides disagreeing. The generation rules push against every one of these, but they cannot guarantee a correct chart. Check each band against the landmarks above, regenerate when one is wrong, or open the result in AI Drawing and ask for that one band to be fixed. Never use a generated chart for a clinical decision.
Most common mistakes on a dermatome chart
A dermatome chart is the hardest anatomy figure for an image model. Check every one of these before you use a generated chart.
MistakeCorrect
MistakeA C1 band, or C numbers on the face
CorrectThere is no C1 dermatome; the face belongs to the trigeminal nerve
MistakeC5 to C8 running down the chest
CorrectC4 meets T2 on the upper chest; C5 to T1 are on the arm
MistakeHorizontal stripes across the arms and legs
CorrectLimb dermatomes run lengthwise along the limb
MistakeC6 on the little finger, C8 on the thumb
CorrectC6 thumb, C7 middle finger, C8 little finger
MistakeT10 at the nipples
CorrectT4 at the nipple line, T10 at the umbilicus
MistakeL4 and L5 swapped on the shin
CorrectL4 inner shin to the inner ankle; L5 outer shin and top of the foot
MistakeBands out of order, skipped, or repeated
CorrectEach level once per side, in order from C2 to S5
MistakeLeft and right sides that do not match
CorrectDermatomes are mirror-symmetric
Dermatome vs myotome vs peripheral nerve territory
Three different maps of the same nerves. A dermatome chart shows only the first.
Dermatome
Myotome
Peripheral nerve territory
What it maps
Skin supplied by one spinal nerve root
Muscles supplied by one spinal nerve root
Skin supplied by one named nerve
Tested by
Light touch and pinprick
Strength of key movements
Touch in the nerve’s area
Example
C6: the thumb
C6: wrist extension
Median nerve: palm side of the thumb, index and middle fingers
Shape on the body
Bands on the trunk, strips along the limbs
Not drawn on the skin
Patches that cut across several dermatomes
Points to
A spinal level or nerve root
A spinal level or nerve root
A nerve beyond the spine (e.g. in the arm)
Dermatome Chart FAQ
A dermatome chart, also called a dermatome map, shows the areas of skin supplied by the sensory fibres of each spinal nerve root, from C2 at the back of the head to S5 around the anus. It is drawn as a body outline, usually front and back, divided into labeled bands. Clinicians use it to work out which nerve root or spinal level is involved when sensation changes; students use it to learn the pattern.
3.American Spinal Injury Association and ISCoS, International Standards for Neurological Classification of Spinal Cord Injury (ISNCSCI): key sensory points
Generate body system diagrams, nerve and spinal figures, blank labeling worksheets with matching answer keys, and revision-ready biology figures with the same SciFigure AI workflow.